Friday, November 4, 2011

Pretty Mokume Gane

I was asked to do something with earrings and bangles that would be festive for the holiday season. I love the combination of white, gold, and black, so I got out some polymer and some composite gold leaf, and made a nice mokume gane stack. Part of the request was to make some earrings that were larger than I usually make. The first shot is of 2 bangles and a smaller pair of earrings. The photo below is of the larger earrings. I love the way the gold sparkles against the contrast of white and black. Anyone for a party?

Monday, October 17, 2011

Inros & Arrowmont

I just got back from a week-long course at Arrowmont School for Arts and Crafts in Gatlinburg, Tennessee. The school itself is in a lovely, woodsy setting, with a dozen or so buildings. Some buildings hold workshop space, some are for housing, many have gallery sections, and all have individual architecture, which adds to the ambiance. For more info on the school and it's various artist programs visit http://www.arrowmont.org/. I found out about the school by chance when doing a Google search for Japanese inro box workshops. So glad I did!

Inro are small rounded portable cases worn on the girdle of Japanese clothing. Originally designed for men to carry medications, they have evolved into items used by men or women as small purses or pockets in which to carry important items. I've always been fascinated by inro, which are often made of wood or ivory or other materials which have been carved, painted, or otherwise decorated. Polymer seemed to me like a perfect medium for inros, but I did not have experience in constructing hollow, 3-dimensional objects. Hence the search for a class.

I'm glad I found Arrowmont. Our instructor, Seth Savarick, has had extensive experience making inros. Check out the gallery of his work here: http://www.slsavarickstudio.com/. The class was excellent, and I did indeed learn how to construct inro - a skill I know I'll use in other ways, too.
Typically, inros have cords, beads and sometimes tassels for decoration. I got so focused on making the inro boxes that the week flew by and I didn't put a cord on any of them. Hopefully, in a little while, I'll get one or two done and show you what they look like. In the meantime, here are some of the inros I created last week.

These first inro are hollow lidded forms. The lids and bottoms have been sanded and buffed while the body of these pieces has been silk-screened. One of the special features of inro is the inside - there is usually a "surprise" in the inner core. For example, in the gold-on-black inro, the inside is silk-screened in reverse so is black-on-gold.

The next photo shows 2 samples of what is known as a flanged inro. In this form, the top and bottom fit very snugly and there is a piece of the inner core that extends from the bottom of the box into the upper section. These are rather tricky to make since, after carefully creating 4 layers in separate steps, and coating different sections of some of the layers with different substances, they must be cut in half - but only half-way through. I've opened one of the inro so you can see the flanged section sticking above the bottom. This is the portion that, when inserted into the top piece, holds the inro together. I found the cutting the most difficult part of the process and need much more practice to feel competent with the blade.

Of course, I was drawn to experiment. I decided I wanted to try a round form. However, none of the materials we had lent themselves to such a shape. So, I went to the wood studio, to see if they had any wooden dowels in an appropriate size. Well - they didn't.
So the instructor grabbed a chunk of wood from their scrap bin, mounted it on his lathe, and whipped me up a perfectly sized and formed dowel. Amazing! It's one of the advantages of working or learning at a place like Arrowmont - with artists and craftspeople from a variety of mediums, you have an excellent chance of finding someone who can help you realize a concept. Here's my round box - not an inro, but I'm quite pleased with it.

One more piece before I go. I think this is
my favorite of all the pieces I did during the week. Not an inro, really, but a little vase-shaped box with decorated lid. Yes - the leaves and flowers are all attached to the lid, so are lifted off when the box is opened. What fun!

Sunday, October 16, 2011

Real Stones & Polymer

In the last posting, I showed you some faux opals I'd been playing with. Today, I'd like to share some pendants that use real stones for embellishment. The rust one has a series of jasper lentils off-set down the left side. The faux wood has a tiger eye cab. My favorite is the navy blue piece, with a Mexican opal in the center. The fire in the stone goes so well with the copper in the "window." These are all designed to hang from a simple chain or wire. It's been fun to experiment with polymer "settings" - and I know I'll be doing more soon.

Thursday, October 6, 2011

Faux Opals

Opals. They're so full of sparkle and depth. The range of colors is just amazing. Real opals are also fragile and crack easily if not cared for properly. I thought it would be fun to see if I could re-create that sparkle and depth with polymer. I found some ideas on the Internet, including an excellent tutorial from Donna Kato, and then launched some experiments of my own.

Part of the trick with making the opal "look" is creating the illusion of depth. Hurray for liquid polymers, translucents, and iridescent flakes! I'm doing some more playing with heat, color, and settings, and will be looking for other inclusion possibilities. I plan to be showing you those in the near future.

Wednesday, October 5, 2011

Translucents with Kathleen Dustin

The Southern Connecticut Polymer Clay Guild (SCPG), of which I am a member, recently sponsored a 2-day workshop on Translucent polymer with Kathleen Dustin. Kathleen is a master polymer artist, and it was an incredible opportunity to be able to work with her. She brings her background in ceramics to the world of polymer, with some amazing results. To see her latest work, check out her blog: http://kathleendustin.blogspot.com/

We spent our time with her learning about some of her techniques with translucents. I love translucent canes and the layers they create. I've made several different pieces with my own translucent canes, but never in quite the way Kathleen presented.

After colorizing a baked base, we covered the base with various translucent canes we made. The final steps involved extensive sanding, carving, and back filling. I was unable to attend the second day, so my piece is missing the carving. I did try it later on a second piece and learned something - I need a lot of practice carving on polymer if I'm going to use it! I am, however, pleased with the results of my first piece.

Another Feather


Hi,

I finally finished this pendant, and loved the colors! Thought I'd share. This feathering technique is amazing. I find the computer screen shows the colors well - perhaps it's the size of the image?

This piece really reminds me of the Southwestern US - all those wonderful formations and cliffs, red rock, and desert varnish on the canyon walls.

Friday, September 9, 2011

Feathering in Clay


I've always loved the look of the feathering technique in lampwork beads, and was pleased to learn there are methods to accomplish a similar look in polymer. I will be teaching a workshop on this technique at the Marlborough Arts Center in October. Here are some photos from a set I made. To me, it seems to have a decidedly Southwestern flavor. I'm going to have to try some totally different colors to see what other effects transpire.


Lanterns

I promised color, remember? Well, here's some color along with a great 3-D concept I really like. I didn't invent this form - saw something a while back, and decided to give it a try.
These beads take time. First, I had to make canes for the fans or blades of the lantern. These are cut and baked separately. Then a core is made, and the fans are carefully placed around the core, opposites at the same time to help keep things stabilized. After a second baking, end pieces can be added, then all is baked again. The hole through the center can be created when the core is made, or drilled later.

Here is a lantern bead with beadweaving embellishment. The fringe has crystals and seed beads, while the "cord" is made of a light twist of various colored ribbons and string. Other cording could be used, I just liked the way the colors corresponded to the cane colors in the bead.


And of course, I had to make a pair of earrings. Can you guess the color?.....

Thursday, September 8, 2011

Different shapes...still black and white

As the past couple of posts have shown, I've been playing with a black and white theme lately. Had to share with you a couple more sets of earrings, dealing with some new shapes. As you can see, I really like the way the clay responds and bends. I promise color soon!

~This first pair is made with a kaleidoscope cane, shaped as cone flower with pearl centers.


~For the next set, I used little 2-sided saddle shapes, embellished with pearls and black firepolish beads.


~These last pairs show a mobius shape, one set with pearls, the other with crystal drops.

Friday, August 26, 2011

Shades of Gray - & some Black and White....

September is right around the corner, and the Westerly Cooperative's September show "Black, White, and Shades of Gray" will be set up this coming week. It's always fun to see the new show, and I'm particularly interested in seeing how many of the artists are able to come up with at least something that fits the month's theme.

As I showcased here a couple of posts ago, I had made some silk screened pieces in the theme's colors - and was very pleased with the results. I made one more silk screened piece - a bracelet - that's different from any others I've made before. Here's a snapshot:In thinking about other options in these color-ways, I remembered the dragon flies on polymer rocks that I made about a year ago....I decided to re-visit pebbles - the gray part of the theme just seemed to fit. What fun! For some reason, one of the pebbles begged for a silver snail, so I made one from PMC. I just love my little pebble set! They're so smooth, I can imagine rubbing them all day.

I also made a "granite" stone with silver leaf for sparkle and a genuine silver (PMC) leaf on the top!


Of course, I couldn't resist making a few of the triangle dangle earrings in these colors. Here are some of the results.


I'm not sure if you can see it, but the gray pair are made with a Skinner blend bull's eye - and the effect is subtle and lovely, I think.


Monday, August 15, 2011

A New Cane & More Loose Beads

Last weekend, the Southern Connecticut Polymer Clay Guild, of which I'm a member, hosted our own "Clay Day" where we all bring our own projects, and clay and play together. It's always a good time - like-minded folks with no pressures, just a fun get-together to create and visit. We had a great time - how could we do otherwise?
I do owe a special thanks to Deb, who generously shared a new cane idea she had picked up elsewhere with the rest of us. We all loved it - and many had to try it out right away. I was in the midst of other things, so waited until I got home to try the new idea. Here are the canes I've made, and some samples of those canes turned into beads or jewelry components. Just love the look! I haven't begun to explore all the possible color-ways with this one. I'm sure you'll see more examples in future posts. In the meantime - what do you think?


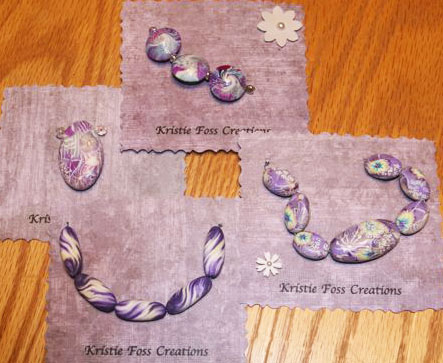
Also, here's a snapshot of some of my beads on background cards for a loose bead show that's coming up quickly. I need a few more sets, then I'll be ready.

Definitely seems to be a color "trend" to my beads this year...

~Kristie

Tuesday, August 9, 2011

It's August - and I'm back!


I'm back! Of course, you probably weren't aware I was away. My husband and I just finished cycling - that's right, pedaling with our own legs - up several mountain passes in the Rockies of Colorado. Amazing views, and tough climbs - especially on a tandem. Really beautiful country.

Now we're home, and I'm busy with beads and clay. I'm working up the samples for the various workshops I'll be teaching this fall. I've got the first bracelet made. This is the class I'll be teaching at Nature's Art in September. More photos of other samples will be forthcoming - as soon as I get off the computer and get back to beads and clay! Keep checking back, and take a look at the workshops and classes page for more info.

I also have a loose bead show at the end of the month, so am working away on my polymer. Here's a sample of the first set I completed. I love chrissy canes, and had to try this experiment. I'm really quite pleased with the results. :)