Wednesday, May 11, 2011

Damascas Ladder ~ Two Versions

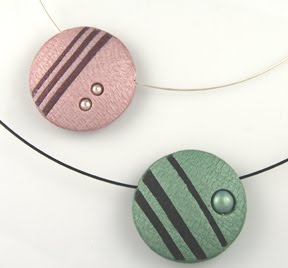
A few weeks ago, I posted a photo of some canes I'd made based on Lindly Haunani's version of the Damascus Ladder. Recently, I've also been playing with the traditional Damascus Ladder. I just finished up a couple of pieces using the different canes, and thought I'd share them here.

To me, the canes based on Lindly's version look a bit like pieces of stained glass. There is a special glow that seems to emanate from the clay.

The traditional form of the Damascas Ladder creates wonderful swirls and stripes. I love both looks. How about you. Do you have a favorite?

Monday, May 9, 2011

Beadweaving ~ Chevron Stitch Flowers

More beadweaving! Just a quick note to show you the project for June at Nature's Art. It may not look like it, but both bracelet bands are made from the same stitch. A small change in edging, and the use of different color beads really changes the look. This is one of the things I love about beadweaving. Everyone chooses different colors and contrasts, and the end results are always unique and individual. I'm a bit more partialy to the red and white piece, though the shimmer of the gold and green is really lovely....Your choice?

Monday, April 11, 2011

Shells as Cabochons

Just finished a sample of the project I'm teaching at Nature's Art in May. Beaded cabochons typically use a specially prepared and cut stone as the centerpiece. For this project, participants may choose items which have thicker sides than usual - items such as shells, uncut stones, or agate slices. The stitch even creates a piece which is reversible! Here's a preview of both sides of a small cream abalone shell. More info on the class page.

Monday, March 21, 2011

Gallery Opening & Show

Hello, Hello!! I know I haven't posted a lot recently, but I have (another) good excuse...I've been working like crazy to get some pieces made and assembled. And here's the reason:

I'm excited - and a bit nervous - to announce that I will be a featured artist at the Artists' Cooperative of Westerly for the month of April. I will be showcasing my polymer jewelry, with a few pieces of a new porcelain and polymer combination I've recently begun making. One of the things I'm including in my exhibit is a set of storyboards. Each of them explains a different process I've used to create the polymer pieces, complete with actual slices from work in progress to help clarify the steps. I hope people find them interesting and informative. Here are a couple of samples:
The April show is themed: "Scratching the Surface - Textures." The show opens on Tuesday, March 31, and runs through Saturday, April 23. The gallery is open Tuesdays through Saturdays from 10:00 am to 5:00 pm. The Opening Reception will be held on Wednesday, April 6, from 5:00 - 8:00 pm. Wine and refreshments are served. The gallery is located at 7 Canal Street in downtown Westerly, Rhode Island, just down the street and on the opposite side from Dylan's restaurant. For more information, you may visit the web site: http://www.westerlyarts.com.

I am sharing the large street front window with a gentleman who makes mosaic glass tables. The Cooperative has artists representing a wide variety of mediums including pottery, porcelain, woodworking, silver, sculpture, glass, watercolor, oils, pastels, photography, fabric work and a variety of mixed-media.

Should you find yourself in Westerly during this time, please stop by! ~Kristie

Sunday, February 27, 2011

Cabin Fever Clay Festival

I'm back. Once again, CFCF was a marvelous experience. The six days were spent learning and sharing while we played with clay. One of the things I like the most is the people I meet. The creativity just seems to pour forth in class after class. The instructors were wonderful, and I came home with ideas and techniques that I have to work with soon! In the meantime, I thought I'd share some canes I made. One day, hopefully soon, you'll see them in completed pieces.
The first photo is of some marvelous Damascus Ladder canes that were the result of a full day of discussion and manipulation of color in a class taught by Lindly Haunani.


The second shot is of some canes I made in Sarah Shriver's class. These were used to cover large forms we shaped and carved by hand using Sculpey Ultra light clay.

Tuesday, February 15, 2011

CFCF 2011 - Off I Go!

Hello!
I haven't been updating as much as I would like. The puppy takes a lot of time - and we love every minute! In the midst of getting her acclimated, I've been trying to condition clay, make blends and beads, and collect supplies for the 6 days of Cabin Fever Clay Festival (CFCF). This is a simply marvelous event held in Laurel, MD. Polymer clayists (don't know if that's a real word, but it looks and sounds good, doesn't it) gather from around the world to attend workshops, seminars and demonstrations given by master artists in polymer. It's fun, it's mind-expanding, and it's exhausting. This is my third year. I missed the first, primarily because I didn't know about it. In addition to learning new techniques and sharing great ideas, I find my creativity pool gets replenished, too. I even have some special friends in the area, so I get some visiting time in, too. A wonderful experience all around.
This year, Judith Skinner, who invented the Skinner blend which we ALL use, is being honored in a special ceremony. We are supposed to make a bead using the Skinner blend technique.We also have a swap. Each of us will give others one of our beads and, in return, we'll collect beads from everyone else. Too fun! I'm going to put in a couple of pictures here. One is a necklace made from the beads I made from a Skinner blend. The beads I'm using for the swap will be like these, in one of 3 color-ways. The other photo shows some focals made using the cane with the various color-ways. These pendants aren't done yet - I have some plans, just no time right now. I'm pretty sure you'll be seeing them again in the future.

Wednesday, February 9, 2011

Procelain & Polymer

Just a quick post. I've been playing with different ideas regarding how to hang the polymer and porcelain pendants I've created. I have been thinking of making necklace "chains" with pearls and stone beads. I also wanted something simpler. So I came up with this idea of using sterling silver neckwire and adding a few crystals for a transition from the bead to the cord. Here are some of the pieces I've made.

Wednesday, February 2, 2011

Puppy!! Oh yes, and some mokume gane

I haven't posted much to this blog lately - and I have the BEST excuse! We have just added the sweetest little female to our family. Anyone who has brought home a puppy knows the preparation that goes on before hand - and all the work that goes into the "once they're home." We're having a wonderful time with Kiri. Her name is a derivation of some Japanese words and translates roughly as one who is beautiful, lovely, and eager. We think the name fits perfectly. Don't you agree? :)

So, while she was taking one of her frequent - albeit short!- naps, I did get out the clay and make some mokume gane pieces. I really love this technique and realized I hadn't done any for quite a while. I usually use 4 colors. This time, I decided to custom mix and limit the number of colors to 3. I'm particularly fond of the periwinkle/green/cream combination.

Saturday, January 8, 2011

Creating & Bits of Whimsy

Creating is a process of continual self-discovery. The mediums I use give me such wonderful opportunities for creating and exploring, and learning something more about myself. Sometimes, I have a notion and set about making it. Other times, a piece evolves as I work. And sometimes, something just sort of "happens." That's what happened with my "Bits of Whimsy" pieces.
A short history: About 3 years ago, I attended a PMC certification training weekend. One of the other participants was Nina Briggs, an artist who makes incredible porcelain clay pieces. Nina was exploring the possibilities of incorporating PMC in her pendants. I became fascinated by her porcelain, and, eventually, she taught me how to make hollow porcelain pendants. [Mine look nothing like Nina's. Visit her web site at www.slsstudio.com to see her lovely work. ] I made a zillion pieces, incorporated a couple of them into beadweaving pieces, and then set them aside.
Last week, that all changed. I was re-arranging my workroom, and ran across the porcelain pieces. As I held a couple in my hands, an idea formed and I moved them to my table. I set about making a couple of petal and leaf canes and, before I knew it, these little woodsy, vine-garden pieces started emerging. The porcelain forms the base, polymer the leaves, flowers, and tendrils. On some, tiny seed beads or heat-set crystals add sparkle and color.
The first friend I showed them to said, "They're so whimsical!" She's right. Often, my pieces are structured with clean, clear lines. These pieces are different from my "usual"...they're more playful and light.


Creating and self-discovery. What fun!
They make me smile. I hope you enjoy them, too.

Wednesday, December 22, 2010

Peeking Inside Hollow Lentils

Oh, yes!!
I love the whole idea of "peeking inside" a bead. If you scroll through my past postings to August 18, you'll see I was playing then with a "peek inside." At that time, I used filled shapes covered with mica shift. The openings in the top of the lentil shapes revealed various inclusions, such as crystals and enamel flowers.
During the past couple of weeks, I decided to give hollow lentil beads a try. These are incredibly light weight, and allow a different method of opening to the inside. Here are some of my new pieces. The two on the left are hung on wire chains. Directly below, peeking inside these three pieces reveals glass pearls, a crystal, and an oval-cut stone.


The bottom photo shows something else new. I decided to see how things would look if the front section was larger and more open. This also gave me the opportunity to use some liquid polymer pieces I made. I love the effect they create in these focals. In case you're curious, the middle piece is a hollow lentil with mica shift veneer.

Monday, December 20, 2010

Tear Away Technique

What a great way to make textures and designs on your polymer pieces! I'd first learned about the Tear Away Technique in a metal clay (PMC) workshop. Celie Fago was given credit for inventing the technique which allows one to create textures from black and white drawings - either your own, or from the numerous copyright free publications available. The process uses polymer clay to create the textures. The texture is transferred paper, and then is used to texture the PMC. The finished silver pieces are lovely and unique.
However- drum roll! - the applications of this technique don't stop there! I'm sure other folks have discovered this, too, but it was a revelation to me. I looked at the polymer piece left after the paper texture was removed and realized that the design in the polymer could be enhanced with paints or other colorizations, and the polymer could then be used in other ways, such as in jewelry.
So, I went on a binge making tear away papers for PMC and then using the polymer pieces for pendants. Had to share the results! Yes - one of the pieces does not use the tear away texture. It's just based on an extruded cane.

Wednesday, December 8, 2010

More 3-D

I'm really enjoying the feeling of manipulating the clay into little floral shapes. Here, I started with a Skinner blend-shaded bull's eye cane to create these calla lilies. Love the intensity of the color!

And I'm still on a bit of a rose-roll... I decided to try a different sort of pin, so purchased some stick pin backs, and set to work. After making a couple of wild roses in matte colors, I decided to see what would happen if I tossed in some embossing powders. I think the result is quite festive - what do you think?