Showing posts with label Premo!. Show all posts

Sunday, January 19, 2020

Relatively Simple Inlay

As you may recall, back in October I had the opportunity to learn a detailed and precise method of marquetry from Bonnie Bishoff.  I didn't get back to this art form for a while, until January approached.  As one of the two featured artists for the January show at the Westerly Gallery, I decided it would be fun to develop some new pieces for the show.  I have several different pieces to share with you.  In this post, I'm just going to show some pendants with what I have always called polymer "inlay."

These pieces are not an intricate, nor as tricky, as the finer marquetry that Bonnie taught us.  I do love the look of these pieces, and had fun cutting and replacing.  I used some of the Accent colors from Premo! for the background, and a skinner blend from purple to coral for the inlaid shapes. Next time, I'll bring you more detailed pieces using some finer marquetry techniques.

Monday, November 18, 2019

Red, White & Green for the Holidays


The holiday season is upon us, and so is the flurry to get some holiday jewelry made.  Here are a couple of sets I've just completed using one of my favorite techniques, mokume gane.  

For the green set, I used layers of Jungle green, white, and some Yellow Gold Glitter.

In the red set, I layered various reds, including alizarin crimson, along with white and Premo!'s White Gold Glitter. 

 A final coating of Magic Gloss resin added depth and shine, and really made the glitter clays sparkle.

Monday, November 11, 2019

Cross-Hatch Marks and Holes

Here are a few pieces trying something a bit new to me.  I have always liked the fabric, tweed-like look in polymer, so was thrilled to find a deep texture piece that created a cross-hatched look.  I decided to make some jewelry, that included round openings and colors.  Here are a few of the pieces I made.

The pieces with red have silver embossing powder highlighting the cross-hatch marks.  I liked the way the edges of the holes gave extra depth to the red circles.  The large piece is a pin.


The blue piece is a pendant, and I used titanium white Pan Pastels to color the cross-hatch design. 


The earrings below have gold (left) and silver(right) embossing powder dusted on black "Twinkle" Premo! polymer.  They are quite sparkly in person, even without any special finish or resin. The crystal balls attached at the bottom of the silver pair make them look quite festive.

Tuesday, August 20, 2019

Fun Summer Earrings

Here are some light, swingy earrings I made for summertime.

I used relatively thick strips of polymer, with swirls of color.   I had tried something like this about a year ago, but used clay that was too thin. I think the only clay you can really roll thin and still have it stand up to use is Kato.


These are all made from Premo!.  On the blue/green and pink pairs, the two shapes move separately.  The addition of Swarovski crystals mounted via head pins with small end balls added some bling.


Monday, October 8, 2018

Architectural Earrings

Hello!  Once again, I tried something a bit different for me, and I really like the results.  These earrings are based on a process developed by Nikolina Ortzan.  She has some really incredible ideas and designs, and many of them are available as tutorials or as completed products online at Etsy.  I made a few alterations in my version of these earrings, and I'm sure I'll try more variations in the future.

I liked that these were open so I could add beads, pearls and crystals.  I also made up my own shapes and styles. These earrings are fun - and they're unusual!

One tip:  if you use a softer clay like Premo!, make sure your clay strips are a bit on the thick side.  If you make the earrings larger, like the ones I made in coral and lime, clay that is too thin will not hold up under too much finger pressure.  A clay like Kato will be strong enough to be used thin, as long as you are sure to bake it at the recommended temperature.


Sunday, August 5, 2018

Color Transfers with an Oriental Flare

 A few weeks ago I had the pleasure of teaching a workshop on color transfers.  There are several different approaches to this process.  I use 70% alcohol wipes in mine, and I have been consistently pleased with the results. For the first time, I decided to use Souffle clay. Souffle is another product from Sculpey. The clay has a somewhat velety feel and a matte texture, and I was not sure how the color transfers would adhere to the non-sticky clay.
In a nutshell, Souffle worked perfectly.  The images adhered very well. In addition, I really liked the matte effect.  Instead of treating the surface after baking, I left the image alone.  The pictures have held up well to touching and the colors have been true to the original image.


The necklace above is a piece I particularly like and was made on Souffle. The other photo to the right is of 2 pins I made using the same technique on Premo! clay.

Friday, February 16, 2018

A Bit More Mokume Gane

I have a couple more pieces I made recently while on the mokume gane kick, and wanted to share them here.  This first set is made using a polymer clay stack of alternating colors, pressed with various objects, then sliced thin.  I really liked the sea blue-green color I custom-mixed and the way the design turned out.  I decided to leave the matte finish.  One of the polymer colors I used was the black glitter accents from Premo! and the sparkle and shine from that color contrasts really nicely with the matte of the blue-green and cream colors I mixed.

This second set was made a bit differently.  I rolled out the layers of clay so they were quite thin, then pressed a rubber stamp into the clay.  I only needed to shave off a thin layer of the clay to reveal the design from the stamp impression.  This method only produces one sheet of design, but it allows the user to make an impression that imitates the picture or design on a rubber stamp.  In this case, I wanted a high shine, so I covered the baked pieces with Magic Gloss for that extra depth and shine.

Friday, October 13, 2017

Earrings, Earrings, Earrings.....

Perhaps you can tell from the title of this post that I have been enjoying an earring-making binge.  It really got started at a workshop with Marie Segal from California.  Thank you Marie! If you ever have a chance to take a class from Marie, or to get her book, do so!  She is filled with information and ideas that don't quit.

This particular workshop, sponsored by the Southern Connecticut Polymer Clay Guild, focused on the use of translucent polymer.  Marie has used a wide variety of translucents, and introduced us to her favorite:  Cernit.  Cernit translucent proved to be an incredibly versatile product, and we couldn't find enough time to play with all the different options.  I particularly liked using the colored translucents mixed with the clear, and incorporating composite goldleaf into the clear translucent.  Pictured in this post are several pairs of earrings demonstrating different applications.

The round disk-shaped earrings demonstrate the translucent qualities the best.  Light shines through these earrings from the back, giving them an overall glow.  The blue and purple earrings have colored translucent swirled on top of clear.  Marie showed us how to make narrow tubes of swirled lines and I couldn't resist making the leaf shapes with them. The aqua earrings have a smaller disc of pressed gold-leaf composite, and these discs really sparkle.

The pairs in red and gold highlighted both the true red color of the Cernit clay, as well as some other techniques that Marie helped us develop.  

In addition to disk earrings, I made some of my favorite triangle shapes.  I added pearls and crystals.  Because of the shape, the clay took on a different look and did not seem quite as transparent.


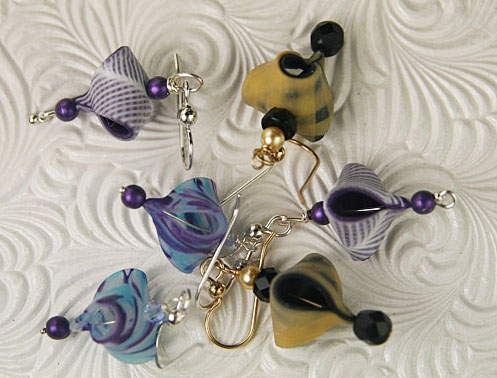
These last earring shown here are not made with Cernit translucent.  Instead, these are made from canes I made using Premo! polymer clays.  I used special ear wires that I could include in the design.  These are really pretty and fun to wear. The long wire in back is especially nice since it not only adds to the design but helps ensure a secure fit.


Saturday, March 4, 2017

Fun Fish!

This class at CFCF 2017 was a lot of fun.  Lisa Haney was the instructor. I always enjoy Lisa's classes.  She comes up with unusual and creative ideas. Last year she showed us how to make a small heart shaped box with a hinged lid.  The hinge was hidden and quite clever.
This year, she taught us how to make fun, colorful, free-standing polymer fish.  She shared a great method of developing the fish body and building the rest of the fish around that base.  My little fish is in the photo above.  First, Lisa had us make an Ikat cane using extruded square rods.  The cane was used for the tail and fins on our fish.  I used parts of the extruded pieces to decorate the tail with colored dots.  The body was made from one of the colors in the cane.  A really clever aspect of this project was the use of a tapered light bulb for the head and body.  The bulb was a perfect shape, and provided a stable form for building the rest of the fish.  Since the bulb was light, baking it and keeping it inside the fish didn't add any real weight to the piece.  The bottom fins are set up in such a way as to support the fish so it can rest on any surface.  I choose to bake mine in "shifts."  First the body, then the tail, mouth and eyes, and a last baking for the remaining fins.  I'm really pleased with how my fish turned out, and I plan on making a few more.
We were quite fortunate to have some of the items needed for this project donated by their producers. Our clay was provided by Polyform. In fact, Polyform provided Premo! clay for most of the workshops, and this was really appreciated.  We had some great colors to choose from, and they certainly helped make our fish bright and fun!  Tandy Leather donated some of their excellent Craftool Pro Stamps.  We used these to create the look of scales on the fish body.  I'm delighted to have these tools for use in the future, too.  Makins gave us each a set of cutters which we used to help shape the tail and fins. These companies and their donations really made a difference to the participants!