Showing posts with label brass cuff. Show all posts
Monday, December 18, 2023
More 3-D Jewelry
Just wanted to share a few more pieces based on Jana Roberts Benzon's techniques. Instead of using a traditional polymer design cane, I made a design stack along the lines of those developed by Carol Blackburn. Since these were not canes that could be covered around the edges, the design shows everywhere, giving these pieces a different look. The rectangular shape of the stack also inspired me to decorate a brass cuff. Fun!!
Sunday, December 16, 2018
Bargello Earrings & a Textured Cuff
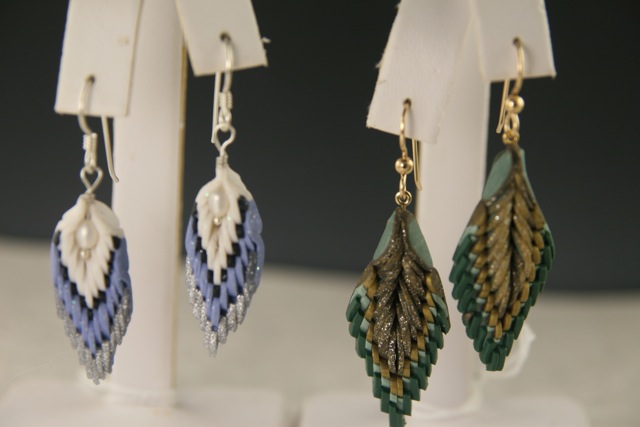
I was working on some more bargello earrings. The first two photos here show the pieces I was working on first. 
Then I started experimenting, making shorter lines of clay, cutting my slices thinner and changing the shape slightly.
These two pair on the left were my first sets made this way.Next I made the earrings below in gray and black. The super thin slices give these an airy somehow elegant appearance.
Finally, I took one of the short striped sets I had, and decided to see how the slices would look in a channel cuff. The texture on this piece is really amazing.
You'll see more of this thinner cut used in some new ways soon!
Thursday, August 23, 2018
Cuffs with "Labradorite"
The Southern Connecticut Polymer Clay Guild recently hosted our bi-annual conference, Clay Connection 2018. While there, a polymer friend of mine, Laura Blakely, demonstrated her take on a technique to create the look of Labradorite stone in polymer clay. I was really intrigued by the effects she achieved, and had to give it a try myself. Well, I gave it a try, and then another try and now... I'm sort of hooked on how fun this process is, and how varied the looks can be. 
Today, I'm going to show you how the sheets made with this process look in my regular brass bracelet cuffs. I think the cuffs in the purples and the one in browns look most like stone.
By the way, if you're interested in giving this technique a try yourself, you can see an excellent tutorial by Ludmila Bakulina on YouTube.
Wednesday, February 7, 2018
Mokume Gane Demo
I really, really like the effects one can achieve with the mokume gane technique. Actually, there have been several different iterations of mokume gane in polymer, so I should, perhaps, refer to it as the mokume gane "concept." Recently, the Westerly Artist's Gallery held a demonstration of various art techniques, and I demonstrated mokume gane in polymer. The first photo, to the right, shows the polymer stack from which the sheet slices came, and a pendant and earrings made from those slices.
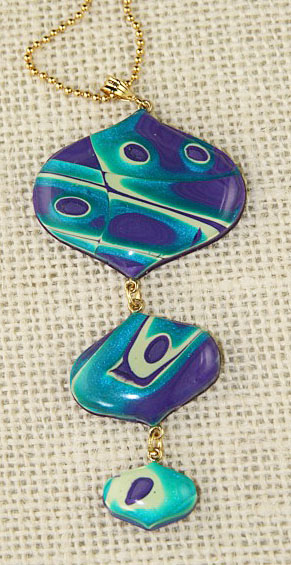
The three piece pendant on the left was also created with sheets from this stack. I really like this new shape form I found, and the tiered look is fun. I covered these pieces with Magic Gloss which adds another level of depth to the design. The last photo shows another pair of earrings, and a brass cuff bracelet. This is a very versatile technique, and would look great covering handles or other objects.

Sunday, October 25, 2015
Ikat Three Ways
I've just returned from New Mexico where I had a fantastic time in a sculpture and armature workshop with Kate Church. Once I finish the pieces I began, I'll post photos and tell you more! Until then, I've other things to share.
Right before I headed to Albuquerque, I presented a workshop on Ikat techniques. I showed the participants a few different methods for achieving the Ikat effect. I thought I'd share some of the pieces I made from canes I developed as part of my demonstrations. Judging from their Ikat stacks and the products students made, everyone was very successful!
The set to the left was made from a 3-color Skinner blend with white strips of clay set on top to add contrast. The blend was then cut up and the piece were off-set making a nice stack. I cut slices from the stack and used a thin bamboo stick to draw the feathered pattern on the clay. Rolling the pieces through the pasta machine enhanced the look. The picture on the right shows a similar feathering pattern applied to an Ikat stack with multiple color stripes.
These pieces in purple, orange and fuschia were made from an Ikat stack made from medium thick logs of clay set up in a specific pattern. You can see the set up online at Polymerclaycentral.com. The earrings and the pendant between them have been further enhanced with some tiny dried flowers, then covered with Magic Gloss. the other pendant has a satin finish, made by sanding and buffing after baking. Also, you'll notice one pendant has the feathered design while on the other I left the Ikat design alone.

The green set was made from a 2-color Skinner Blend that I did not reduce as much as the other stacks I made. Again, I decorated with the little dried flowers and sealed the surface with the Magic Gloss resin.

The brass cuff bracelets below were covered with twisted and swirled snakes made from the various Ikat stacks. I love the way the colors and textures interact.
This last photo has a few pieces made based on a technique that Lindly Haunani uses for Ikat stacks. She has a great class teaching leaves using this technique on CraftArtEdu. If you like the Ikat look, her class is excellent.
Right before I headed to Albuquerque, I presented a workshop on Ikat techniques. I showed the participants a few different methods for achieving the Ikat effect. I thought I'd share some of the pieces I made from canes I developed as part of my demonstrations. Judging from their Ikat stacks and the products students made, everyone was very successful!
The set to the left was made from a 3-color Skinner blend with white strips of clay set on top to add contrast. The blend was then cut up and the piece were off-set making a nice stack. I cut slices from the stack and used a thin bamboo stick to draw the feathered pattern on the clay. Rolling the pieces through the pasta machine enhanced the look. The picture on the right shows a similar feathering pattern applied to an Ikat stack with multiple color stripes.These pieces in purple, orange and fuschia were made from an Ikat stack made from medium thick logs of clay set up in a specific pattern. You can see the set up online at Polymerclaycentral.com. The earrings and the pendant between them have been further enhanced with some tiny dried flowers, then covered with Magic Gloss. the other pendant has a satin finish, made by sanding and buffing after baking. Also, you'll notice one pendant has the feathered design while on the other I left the Ikat design alone.

The green set was made from a 2-color Skinner Blend that I did not reduce as much as the other stacks I made. Again, I decorated with the little dried flowers and sealed the surface with the Magic Gloss resin.

The brass cuff bracelets below were covered with twisted and swirled snakes made from the various Ikat stacks. I love the way the colors and textures interact.
This last photo has a few pieces made based on a technique that Lindly Haunani uses for Ikat stacks. She has a great class teaching leaves using this technique on CraftArtEdu. If you like the Ikat look, her class is excellent.
Sunday, March 1, 2015
More Black & White "Magic"
Today, I'll be sharing some photos of earrings and bracelets I made to fit into the Westerly gallery theme for March. First, the cuff bracelets. These flowers were both created from petal canes I made. I reduced a portion of each cane in order to have different sizes to use for the inner and outer petals. The bolder black and white flower on the left is mounted on a single piece brass cuff. I put a magnetic clasp in the opening to help secure the bracelet. The flower on the right is set on a hinged cuff that stays closed while worn.
The diamond-shaped earring pairs fit well into the "magic" theme since they seem to need a second look to figure out the design.
The striped pairs almost look like the lines are moving, especially when they swing from the ears.
The last pair of larger tube-shaped earrings were made from a kaleidoscope cane. This was a cane composed of several simple canes. When the pieces are combined, reduced, and combined again, the resulting pattern can almost seem like "magic."
Monday, February 2, 2015
Feeling Wistful
Yes, I'm feeling wistful - missing leaves on the trees, flowers, grass, colors other than brown, white, and gray...It may only be the beginning of February, but we've been having more than our share of winter here in Connecticut. Guess that's why, when I picked up some brass bracelet forms to work on, I ended up with leaves, vines and even a flower or two. The large teal and turquoise flower to the right is secured to a white-coaated, filigree brass bracelet cuff.
The other bracelets are on brass open cuffs. I like these cuffs. They are lightweight and lend themselves to decoration. To ensure they stay on, no matter what the wrist size, I added a magnetic clasp. Here's the first one:
Below are three more. These are all made from the same cane, just done in different colors.
The other bracelets are on brass open cuffs. I like these cuffs. They are lightweight and lend themselves to decoration. To ensure they stay on, no matter what the wrist size, I added a magnetic clasp. Here's the first one:
Below are three more. These are all made from the same cane, just done in different colors.
Labels:
bracelet,
brass cuff,
cuff,
filigree,
flowers,
magnetic clasp,
polymer,
spring
Sunday, March 23, 2014
Polymer "Pottery": Modified Faux Ceramic Technique for Cuffs
Thought I'd share what I did last night. This is sooooo easy, and I love the results! As I was working on more ceramic effects in polymer, I realized everything I was making was on a flat surface. I need at least a few brass cuffs for the show. I didn't think the liquid polymer with alcohol ink approach would work on a curved surface without a lot of dripping, so I decided to see if I could make the other technique work. I simplified the steps I'd used on the pendants, and I think the cuffs turned out nicely.
The steps are simple:
Condition your clay. For the ceramic looks, I make my own cream color that is a mixture of white, pearl and small (tiny) amounts of ecru and yellow. Rolled out to a thickness of 2 (Atlas), the clay fits well on the channeled cuffs. A texture or design can be imprinted on the clay first, then a strip can be cut out and placed on the cuff. Alternately, the clay can be placed into the cuff, and then impressed with a design. Be sure to use a release if your texture plate requires one. Once the clay is pressed into the cuff and the edges and ends are evened and pressed in, the fun part begins.
Of all the various color techniques I'd been using doing the faux ceramic look, I found using pastels the most fun. The tutorials and ideas I'd found suggested using your finger to apply the chalk. However, that approach sometimes left prints or made a spot of color that was too large or dark for what I wanted, so I decided to use small paint brushes to add the color to the design. The first photo shows two cuffs after the pastels have been added and the cuff baked. Each cuff has 5 or more colors. I found that the results looked different if all the brush strokes went in the same direction, or if different colors were laid on in different directions. Experiment! The second photo is the same 2 cuffs after being sprayed with PYM2. I liked both looks, but wanted to be sure the pastels were protected against wear. Easy, fun, and and definitely ceramic-like.
The steps are simple:Condition your clay. For the ceramic looks, I make my own cream color that is a mixture of white, pearl and small (tiny) amounts of ecru and yellow. Rolled out to a thickness of 2 (Atlas), the clay fits well on the channeled cuffs. A texture or design can be imprinted on the clay first, then a strip can be cut out and placed on the cuff. Alternately, the clay can be placed into the cuff, and then impressed with a design. Be sure to use a release if your texture plate requires one. Once the clay is pressed into the cuff and the edges and ends are evened and pressed in, the fun part begins.
Of all the various color techniques I'd been using doing the faux ceramic look, I found using pastels the most fun. The tutorials and ideas I'd found suggested using your finger to apply the chalk. However, that approach sometimes left prints or made a spot of color that was too large or dark for what I wanted, so I decided to use small paint brushes to add the color to the design. The first photo shows two cuffs after the pastels have been added and the cuff baked. Each cuff has 5 or more colors. I found that the results looked different if all the brush strokes went in the same direction, or if different colors were laid on in different directions. Experiment! The second photo is the same 2 cuffs after being sprayed with PYM2. I liked both looks, but wanted to be sure the pastels were protected against wear. Easy, fun, and and definitely ceramic-like.
Sunday, December 15, 2013
From Yesterday....
Told you I'd have to do something with the canes from yesterday....So, here are a few cuff bracelets to show more variations of the cane patterns. The 2 cuffs to the right were made from canes I put together based on the geometric core cane. The other 3 cuffs below were decorated with canes from the kaleidoscope patterns pictured in yesterday's post. It's always fun to see the clay move to something you can use. Tuesday, November 5, 2013
Black-Line Transfers
There are probably hundreds of techniques in polymer I haven't tried yet, and I'm sure more are being explored and developed every day on the worktables of polymer artists. I realized the other day that one technique I haven't used is black-line transfers. Actually, I've done very little with transfers at all, and decided to give black-line a try. I made a few bracelets... actually, I'm on a roll, and can't seem to leave this particular project alone.
For materials I'm using brass channeled cuff and bangle forms. The base clay is translucent and I've mixed in sheets of metal leaf. In some cases, I also added just a bit of sold clay to color things slightly. You don't need much color at all to affect translucent. I plan to try using alcohol inks, too, since they'll create a brighter color without affecting the translucency as much as opaque clay does. The black-line designs are from copyright free publications designed to be used in projects.
After the pieces are baked, I've added a light coating of PYM II. Since these pieces will be on the wrist and will probably get a good amount of handling, I wanted to protect both the design and the metal leaf in the base.
Pictured here are some of the first cuffs I made. I'll try to get back here with some other examples soon.
I'm back - here are some bangles made with the same technique. Less design, but still quite pretty. The bolder design on the aqua seems to show up well in this narrower format.
Sunday, October 6, 2013
An Ikat Fall
The colors are shifting in the leaves, and trees are ablaze here. Even a rainy day is pretty, and just intensifies the tones. I was inspired to make some Ikat canes and convert them into leaves. Of course, they needed matching bracelets, too. I'm particularly fond of this lime-orange-purple Ikat color combination. It does look like so many of the leaves falling from the trees in my yard.
Then I drifted to a purple-red-green combination. So many of the deeper maples have all three shades together on each leaf.
Finally, I couldn't resist a turquoise-purple-deep green combination. Granted, none of the leaves around here are actually sporting these colors - but wouldn't it be amazing if they were!
Then I drifted to a purple-red-green combination. So many of the deeper maples have all three shades together on each leaf.Finally, I couldn't resist a turquoise-purple-deep green combination. Granted, none of the leaves around here are actually sporting these colors - but wouldn't it be amazing if they were!
Labels:
bangles,
bracelets,
brass cuff,
fall,
ikat,
ikat cane,
leaves,
pendants,
pins,
polymer,
polymer clay,
polymer jewelry
Sunday, August 4, 2013
A "Spidery Mum" Cane
In my June post, you may have noticed the cane I made that Ron Lohocky used on some of his wonderful heart pins. I've been on a bit of roll making more of these canes - and figuring out what to do with them. I call this cane a "spider mum" cane because it looks to me like the long thin petals on a spider chrysanthemum. These are a variation of the wedge cane that I like to make and use in many of my flowers. This particular variation is based on one Marie-france Tournat posted on her blog, Polymeramoi. By the way, hers is an excellent blog and definitely worth a visit.
Back to the spider mums....I started experimenting with different pieces, and have some here to share. You did see some flower shapes from these canes on the Brass Bracelet Forms piece I posted a couple of weeks ago. Here, I made some flat brass channel cuffs and some earrings using the canes.
The mobius shape on these earrings is one I've used before and I really like. This time, I flattened 2 sides so the pieces are not completely symmetrical.
I also had to try the ruffled flowers as earrings. The red and blue pairs are petals within petals. I just used 2 layers, but you could certainly add more. The centers are small silver balls and pearls.
The other two cream and colored pairs are posts and have two petals attached to each other vertically. There really is no limit to what you can do with polymer and polymer canes. Let your imagination run free - and experiment!
Back to the spider mums....I started experimenting with different pieces, and have some here to share. You did see some flower shapes from these canes on the Brass Bracelet Forms piece I posted a couple of weeks ago. Here, I made some flat brass channel cuffs and some earrings using the canes.
The mobius shape on these earrings is one I've used before and I really like. This time, I flattened 2 sides so the pieces are not completely symmetrical.I also had to try the ruffled flowers as earrings. The red and blue pairs are petals within petals. I just used 2 layers, but you could certainly add more. The centers are small silver balls and pearls.
The other two cream and colored pairs are posts and have two petals attached to each other vertically. There really is no limit to what you can do with polymer and polymer canes. Let your imagination run free - and experiment!
Labels:
bracelet,
brass cuff,
chrysantemum,
earrings,
flowers,
Marie-frnce Tournat,
mobius shape,
polymer canes,
polymer clay,
polymer jewelry,
Polymeramoi,
spider mums,
wedge cane,
wedge petal cane
Monday, July 15, 2013
New Brass Bracelet Forms
I like bracelets, and have made several bangles in all polymer as well as bangles and cuffs using brass channel blanks. One of the problems with a closed bangle is sizing, since peoples' wrists vary widely.
Recently, I've found some brass bracelet forms that have given me some fun options for design. Here are some of my new pieces.
The red and yellow flowers were formed a petal at a time and pressed through the brass filigree to secure the flower to the base. I particularly like these bracelet forms because they have a well constructed hinge. This makes opening and closing the bracelet very simple, and helps ensure the piece stays on. The filigree is a nice touch.
These last three bracelets were made on a different bracelet form, one with 2 thin brass bands. These bracelets are very easy to put on and take off, but I wanted to be sure they wouldn't come off too easily during wearing. I found a magnet and clasp combo that works just perfectly in the opening on these bands, and makes a nice "safety" chain. The polymer flowers and leaves are on both sides of the brass bands, securing the design to the base.
I think these bases work perfectly with polymer, and I'm pleased to have found bases that support 3-dimensional work.
Recently, I've found some brass bracelet forms that have given me some fun options for design. Here are some of my new pieces.
The red and yellow flowers were formed a petal at a time and pressed through the brass filigree to secure the flower to the base. I particularly like these bracelet forms because they have a well constructed hinge. This makes opening and closing the bracelet very simple, and helps ensure the piece stays on. The filigree is a nice touch.
These last three bracelets were made on a different bracelet form, one with 2 thin brass bands. These bracelets are very easy to put on and take off, but I wanted to be sure they wouldn't come off too easily during wearing. I found a magnet and clasp combo that works just perfectly in the opening on these bands, and makes a nice "safety" chain. The polymer flowers and leaves are on both sides of the brass bands, securing the design to the base. I think these bases work perfectly with polymer, and I'm pleased to have found bases that support 3-dimensional work.
Labels:
3-D,
3-d shapes,
3-dimensional,
bangle,
bangle bracelet,
bracelet,
brass cuff,
cane,
clasp,
cuff,
flower,
hinge,
hinged,
hinges,
magnets,
polymer
Subscribe to:
Posts (Atom)