Showing posts with label Eugena Topina. Show all posts

Sunday, July 19, 2015

More Master Class Camp with Eugena Topina

After having spent 2 days with Eugena Topina making those amazingly versatile stamping tools, I was pleased to have a second class with her.  Due to personal circumstances, one of the scheduled presenters was unable to attend, and Eugena graciously offered to teach a class to fill that void.  I'm delighted she did!  This class was a brand new one for Eugena, and took us off on an adventure with organic shapes and textures.  I've not done much work with organic shapes, so this class really helped me try something new.  Keep an eye on her website:  http://www.eugenascreations.com/  I'm sure she'll have a new tutorial for this process soon.  It's really fun and creative!
We started with white clay, though we could have used colors if we wished.  Knowing we would be colorizing things later was a good reason to stay with pale colors or white, especially for our initial experience with the process.    Eugena guided us through shape formation and introduced us to a myriad of texturing techniques.  Every design and texture in the pieces you see here was made by hand, following methods that Eugena has developed.  Most of them used everyday tools or items that would be easy to find.  Eugena is very imaginative.  The results were amazing and the whole process was a lot of fun!

After making several of the rounded shapes, and playing with various texture concepts, we experimented and created some shapes of our own.

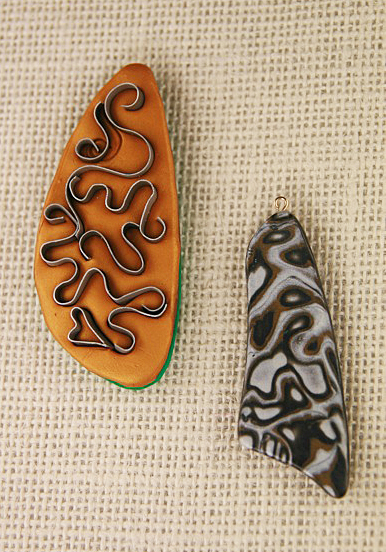
On the second day of class, we dove into colorizing our pieces. As you can see in the last 2 photos here, I tried some organic shapes of my own and had a grand time with colors!  Thank you, Eugena, for a great class!

Friday, July 17, 2015

Master Class Camp 2015 - Learning Something New!

I've just returned from Laurel, Maryland, where I attended Master Class Camp 2015.  Camp is composed of a series of two-day workshops with some outstanding polymer artists as instructors.  I was fortunate to take classes from both Eugena Topina and Lindly Haunani.  I had a great time, learned much, stretched my thinking, and pushed beyond my comfort zone a bit.  I'll be posting samples of my work from their classes over the next few days.

The first class I took was with Eugena Topina.  She has some excellent tutorials available online, and I was delighted to have this opportunity to meet and work with her.  This class focused on the development of a "stamping" tool.  It was the first time I've taken a workshop for the development and design of a tool, and I found the idea - and the process - fascinating.  Since this class is also available as a tutorial, I will not go into detail on how the stamping tools were developed.  Here, I have photos of some of the stamping tools I developed in class with an example of an application possible with the tool.  I definitely plan on making more of these tools and using them in my creations.
                                                                        To the left is a piece using one of the tools I made and demonstrating the mokume gane technique.                                                                                Below are two additional examples of tools used to create unique designs.


Wednesday, December 24, 2014

Rainy Day Tutorial Play

A rainy day can be one of the best times to try out a polymer tutorial.  Since it's been pouring outside, I decided to give one a try. I had seen Eugena Topina's version of polymer cloisonne, and decided to see how she achieves her effects.  If you like the occasional tutorial, you might really enjoy visiting Eugena's website: www.eugenascreations.com.  She has a wide variety of tutorials that are clear and easy to follow. Since this cloisonne effect is a tutorial she sells, I can't share the technique.  However, I can share my finished products. Perhaps they'll tempt you to visit Eugena's website and see what else she has developed.


These first two pieces, the teal and gold above and the orange and gold to the right, are pendants.  I used Magic Gloss to provide the final protective finish.


The last piece is larger and will work well as a pin.