Showing posts with label polymer clay. Show all posts
Thursday, January 25, 2024
January Theme
Hello! It's hard to believe we're already into 2024. I'm look forward to another year of creativity and learning.
At the Westerly Artists' Gallery, we've started a new year of monthly shows, many with a theme. This month's theme is "Inner Worlds/Outer Worlds. Artists are encouraged to try to create something that fits the theme, if appropriate. I had a couple of ideas, so created three pendants demonstrating my interpretation of the theme. The first and last pendants show an outer world with an opening to an inner world. The middle piece shows a little creature from the inner world peeking out at the outer world. It was interesting and fun to make these.
What would you do to "fit the theme?"
Thursday, August 10, 2023
Some Summer Necklaces
Summer jewelry can go in many different directions. It can range from wild or colorful, to soothing and cool. These three necklaces show a little of each of these. The spin-wheels to the left in hot pinks and yellows make a perfect eye-catching necklace or a fun bracelet. The yellow necklace is enlivened with reds, whites and a touch of black. It sits perfectly around the neck just above a scoop neckline.The aquamarine and pale yellow piece below brings a refreshing cool on a warm evening. This is one of my favorite colors.
Sunday, March 19, 2023
Adding Mesh to Polymer Jewelry
Hello! As I mentioned in my last post, Julie Picarello also showed us how to add mesh to our jewelry pieces.
In this first photo to the left, you'll see two pendant pieces and a pair of earrings. The pendants have mesh added. In the piece on the top right, I added 2 pieces of copper mesh, and then backed the whole piece with the solid raspberry color that was used in the mokume gane slice. The piece at the bottom has aluminium mesh, and the backing had the space cut out so that light shined all the way through. Julie also showed us how to use various products to color the mesh, but I preferred to leave mine plain.
This second photo shows a differently colored mokume gane stack slice, with a copper mesh insert. The long piece on the left of the photo is something Julie calls a "lizard tail". I haven't decided just what I plan to do with this sort of piece, but they're a lot of fun to make!
Monday, September 14, 2020
The "Personal Challenge" Continues
If you've been reading this blog recently, you know that during the month of August, several members of the Southern Connecticut Polymer Clay Guild (SCPCG) participated in a weekly challenge called the 820 Challenge. Each person picked a personal goal, interest or challenge, and would share progress weekly with the whole group. It was a great learning experience - and fun to see and share with others. So, we decided to continue the concept of a personal challenge. This time, we're meeting on zoom every other week rather than weekly. It gives us all a bit more time to experiment.
I plan to use this challenge to try some tutorials I've never done, as well as experiment with different materials or tools, and try out some ideas of my own. Should be interesting - and fun!
For this first session, I decided to try a tutorial that uses dish detergent to create surface bubbles for decoration and texture on polymer clay. The tutorial comes from Thinking Outside the Box and is titled "New Polymer Clay Surface Technique." It's a fun technique, and I enjoyed giving it a try. Since this was an experiment, I didn't spend a lot of time finishing the edges. I liked this enough to plan on doing it again, and will pre-plan edging and finishing work. I used Magic Gloss for the resin top, while the tutorial suggests using another product.
In these two samples, you can see how the soap bubbles create a fun background look and texture. The Lumiere halo paints also reacted differently, and the lighter color showed the bubble texture off best. I don't know if mica powders would work well, and may just have to experiment some more. :)
Monday, July 27, 2020
Summer Challenges!
As some of you are probably aware, for a few years I have been teaching polymer clay classes. Once a month, I would pick a topic and meet with interested participants to show them a new technique or concept using polymer clay. When the pandemic hit the US, my classes were put on hold, with the hopes that we'd be able to meet together again soon. As time has gone on, it's become obvious that we are still in a holding pattern. So, I decided to offer a monthly "polymer challenge" to those who had been taking my classes and were interested in doing more. In June, our first challenge was to make a bead out of polymer that was new or different for that particular artist. We had a zoom meeting to share our creations and catch up with one another. It was a lot of fun!
For July, the challenge was to create something with a summer theme. The projects people chose to make were as varied as the group! The image here is a magnet I made for my July challenge project. I used embossing powder inside translucent clay for the ocean, and embossing powder on the surface of translucent and ecru for the beach. The waves were the real experiment for me. I wanted to have clay that was super soft and almost like paint. I mixed white, translucent and liquid clay until I had a consistency I wanted. Then I rolled snakes of this mixture out, and pressed them into the base using a couple of different clay tools. For my first attempt, I'm pleased with the way the waves look. I'll be working on other scenes with this mixture in the future to see what happens.
Monday, July 20, 2020
Inchies!
Inchies are small, one-inch square polymer tiles. They are usually used at polymer clay
events for swaps among the participants. In this way, each participant goes home with tiles that remind of the other people, the conference, and might give them ideas of something they could try themselves. Inchies don't have to be elaborate, and
they don't have to take a lot of time either, especially when you are making 50
or more to swap with others at a polymer workshop or retreat. This year, since the Clay Connection is
being held virtually, participants are making one inchie each, photographing
it, and sending the photo along to Cat, a member of the SCPCG. Cat will be making a collage of the
photos, so we can see all our art work together on one place. So, here is my inchie.
Since I only needed to make one, I was more elaborate than I usually would be. Often, Inchies are cut from a large sheet of polymer that the artist has covered with a sample of a particular texture or technique, such as mokume gane or stenciling. I'm really looking forward to seeing what other folks have done.
Since I only needed to make one, I was more elaborate than I usually would be. Often, Inchies are cut from a large sheet of polymer that the artist has covered with a sample of a particular texture or technique, such as mokume gane or stenciling. I'm really looking forward to seeing what other folks have done.Saturday, July 18, 2020
SCPCG "Virtual" Bottles of Hope
Usually, July signals that it's time for a polymer retreat in Connecticut or New Hampshire. These retreats are hosted by the polymer guild from that state, and are offered in alternating years. This year, the Southern Connecticut Polymer Guild (SCPCG) was all set to offer their usual 4-day polymer Clay Connection. Sadly, the current pandemic has intervened, and SCPCG has decided to offer a virtual retreat. In addition to demo lessons, raffles, challenges and games, the Connecticut retreat also features a Bottles of Hope challenge. Bottles of Hope are small glass bottles covered with polymer clay and given to cancer patients. They symbolize a wish and a hope for health. This year, instead of making the bottles during the retreat, online participants are making bottles, taking photos, and sending the photos in so that they may be displayed online for all participants to see.
I found a couple of special small bottles that I thought were perfect for this purpose. The bottles are sort of an hourglass shape, and came with cork stoppers. Here are the two bottles I decorated with polymer clay. You'll notice that one bottle is very exposed. You can see its shape clearly, and also see the vine-like design going around the bottle, visible through the glass. I almost completely covered the second bottle, though I did leave the bottom open to allow peeking inside.
The Bottles of Hope project is ongoing, and has spread across the US and in other countries. Perhaps there is a polymer guild or group near you that is also participating in the program, and you might decide to decorate some bottles for them sometime. It's a fun project, it's creative, and it means a lot to the recipients.
Search Results
Web results
Sunday, December 22, 2019
Silk Screening
Recently, I held a class on silk screening polymer clay. We used Lumiere acrylic paints and small silk screens on raw polymer. Most of the students chose to make Skinner blends of two or three colors with their polymer before laying down the silk screen and applying the paint. The results were simply lovely, and quite varied. Since I had the materials gathered, I made a few more sheets at home. Here are some of the pieces I made from the silk screening. I covered the pieces with Magic Gloss to help protect the paint. Although the paint bakes into the polymer, and I have left silk screened pieces with a matte look, I do like the extra depth the Magic Gloss and other resins add to the polymer pieces.

Thursday, December 12, 2019
A Reversible Leaf & More Dichroic
Here are a few more pieces I've created for the Holiday Show in Westerly. This seems to be the time of year for a bit of glitz and shine. These pendants all have some sparkle on their own, and the addition of Magic Gloss resin as a finish really makes them glow.
These first photos are of a reversible leaf pendant I made. One side has a lot of sparkle in the clay and is finished with Magic Gloss while the other side I just buffed and polished without a finish layer.

The two sides look quite different, which increases the wearability. I really like the whole reversible concept.
The rest of these pendants use metal leaf and alcohol inks, finished with a Magic Gloss coating to protect the leaf. This process really makes the colors vibrant. I particularly like the pieces in reds and blues. I used strips from a sheet I'd cut up for other pieces, and the collage effect brings attention to the various colors.

These first photos are of a reversible leaf pendant I made. One side has a lot of sparkle in the clay and is finished with Magic Gloss while the other side I just buffed and polished without a finish layer. 
The two sides look quite different, which increases the wearability. I really like the whole reversible concept.
The rest of these pendants use metal leaf and alcohol inks, finished with a Magic Gloss coating to protect the leaf. This process really makes the colors vibrant. I particularly like the pieces in reds and blues. I used strips from a sheet I'd cut up for other pieces, and the collage effect brings attention to the various colors.

Thursday, November 28, 2019
Texture & Glitz
One of the features of polymer clay is how well it adapts to texture. As I mentioned in an eariier post, I have a new silicon rubber mat with a cross-hatch pattern that looks a great deal like a woven fabric. and I've been enjoying working with it. Here are a few more pieces I've made using the new texture. I pressed embossing powder into the textured clay before cutting, then baked the pieces. The embossing powder bonded well with the clay, so I did not put a finish on the pendants and pins, primarily due to the openings on many of these pieces and the flower charm sticking through. I am also making earrings with the texture and the embossing powder. I plan on using Magic Gloss on them to give the powder extra shine.
Monday, November 18, 2019
Red, White & Green for the Holidays

The holiday season is upon us, and so is the flurry to get some holiday jewelry made. Here are a couple of sets I've just completed using one of my favorite techniques, mokume gane.
For the green set, I used layers of Jungle green, white, and some Yellow Gold Glitter.
In the red set, I layered various reds, including alizarin crimson, along with white and Premo!'s White Gold Glitter. Friday, November 1, 2019
Great Little Lidded Box
I recently had the pleasure of attending a 2-day workshop with Carol Blackburn from the UK. The class was sponsored by the New England Polymer Artists' Guild, and I'm delighted they brought Carol here. She has a wealth of knowledge regarding polymer clay and has so many ideas and tips to share! I hope she is in this area again because I'd love to take another class with her. For this workshop, Carol taught us how to construct and decorate her small lidded boxes. I love the shape of these, and her method for creating the structures worked beautifully. Participants also had fun creating polymer stacks that we used to decorate the sides of our boxes. Here are photos of the sides of my box. I can still decorate the lid more if I want, I just haven't quite decided what I want to do.
Sunday, August 25, 2019
Fabulous Fabiola Perez Ajates
Fabiola Perez Ajates was another one of the wonderful instructors at Clay Back East 2019. I totally enjoyed Fabiola's class. Her manner was light and fun, and her love of creating and sharing her ideas was obvious.
Fabiola demonstrated several of her techniques for decorating polymer clay and creating interesting patterns and designs. She also generously shared with us many of the shape templates she uses to create her jewelry. She explained that she bases her pieces on a 27 color palette she has developed. This is one reason why her work always seems so harmonious. I loved the colors she had us all using: an aqua green, a rosey red, white, and black.
The photo here shows three pendants I created using her concepts. I'm eager to develop a palette of my own to use in this way. Her work is lovely!
Thursday, July 18, 2019
Brilliant Bettina Welker!
A few weeks after Clayathon, I returned to southern New Jersey to attend Clay Back East, 2019. This polymer conference was sponsored by Donna Kato and her conference crew. It was really marvelous! The format was based on workshops from top-flight polymer artists. We had 3 full-day and 2 half-day classes, with instructors moving from room to room. This meant we all attended every workshop in reasonably sized groups. Great plan!
Today I'd like to share the closing bracelet cuff that Bettina Welker developed. The clasp is unique, hides itself within the overall design, and is comfortable to wear. If you get a chance to take her workshop on this design, do so. I can't go into detail, since it is her invention. Just know that she really has come up with a clever and strong method of securing the cuff so you can wear it without worrying about it possibly slipping off.
That is the clasp between the pink and purple rectangles. Pretty cool!

We also had fun decorating the various rectangular shapes and placing them on the cuff. I used a ribbon cane that Donna Kato introduced to us to make the wavy stripes. I like the different look.
Today I'd like to share the closing bracelet cuff that Bettina Welker developed. The clasp is unique, hides itself within the overall design, and is comfortable to wear. If you get a chance to take her workshop on this design, do so. I can't go into detail, since it is her invention. Just know that she really has come up with a clever and strong method of securing the cuff so you can wear it without worrying about it possibly slipping off. That is the clasp between the pink and purple rectangles. Pretty cool!

We also had fun decorating the various rectangular shapes and placing them on the cuff. I used a ribbon cane that Donna Kato introduced to us to make the wavy stripes. I like the different look.
Wednesday, July 17, 2019
Polymer Abstract Hollow Form
At Clayathon 2019, I had the opportunity to take a 2-day workshop with Helen Wyland-Malchow. It was a fantastic class! Helen's instruction was clean, clear, and precise, with lots of smiles tossed in. We made these outstanding free-form hollow "boxes" -- no two were alike. I loved the slab construction Helen taught. She has been a high school art teacher, and she brought her skills in teaching and in art and creativity to construction in polymer. If you get a chance to take a class from Helen, do so! It was really fun and I learned techniques I'd never seen before.
Since it took us 2 days, there is just too much to explain. However, I think a couple of photos will give you an idea of what we did. The veneer designs were our own. I decided to make an Ikat stack that I feathered on one side. We also made little "lids" for our forms. Mine was really quite small compared to the hollow form. In the first photo, the lid is in place. In the second photo, it's lying in front of the form. We all had lots of fun coming up with designs, shapes, and making the whole thing work!
Friday, June 21, 2019
Oodles of Earrings
I belong to the "you can never have too many pairs of earrings" club. I also love making them! For the June show, I created a lot of different surface sheets and canes, and created earrings from those creations. Here are several pairs in different colors, shapes and finishes. I have my favorites - do you?
Sunday, December 16, 2018
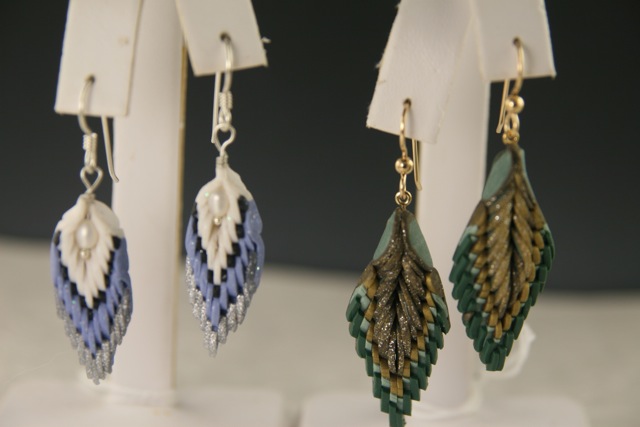
Bargello Earrings & a Textured Cuff
I was working on some more bargello earrings. The first two photos here show the pieces I was working on first. 
Then I started experimenting, making shorter lines of clay, cutting my slices thinner and changing the shape slightly.
These two pair on the left were my first sets made this way.Next I made the earrings below in gray and black. The super thin slices give these an airy somehow elegant appearance.
Finally, I took one of the short striped sets I had, and decided to see how the slices would look in a channel cuff. The texture on this piece is really amazing.
You'll see more of this thinner cut used in some new ways soon!
Subscribe to:
Posts (Atom)