Friday, December 30, 2016

New! Tube Beads and Ribbon

For January, the Westerly Arts Gallery has the theme: "Evolving - Expression and Experimentation." I'm going to be showing my polymer enhanced wine glasses, since those haven't been shown "in public" yet, and are definitely a different expression of polymer art for me.  However, I also wanted to do something experimental with jewelry pieces.  I really like tube beads, but have only made little oriental-influenced pendants with them.  I wanted to go hollow, wider, and open, mixing in some other media at the same time.
I played around a bit.  It didn't take too long to come up with a good clay depth for short, hollow tube beads.  Once I had assembled and baked a few, I liked what I had.  Now, to put them together....The search for appropriate materials took the longest time.  I love ribbon, and was pleased to find some lovely hand-dyed silk ribbon in some great colors. I also looked for something with a little sparkle, and found a tiny yarn skein with sequins. I wish it came in more colors.  I've made 2 of these necklaces and they will be on display in the window at the gallery for the month of January. You get to enjoy them here!

The necklace to the above left has tube beads made from a polymer cane I made in purples and blues.  I made these beads of different widths so the places where the ribbons show through are of different sizes and add an irregular feel to the piece.

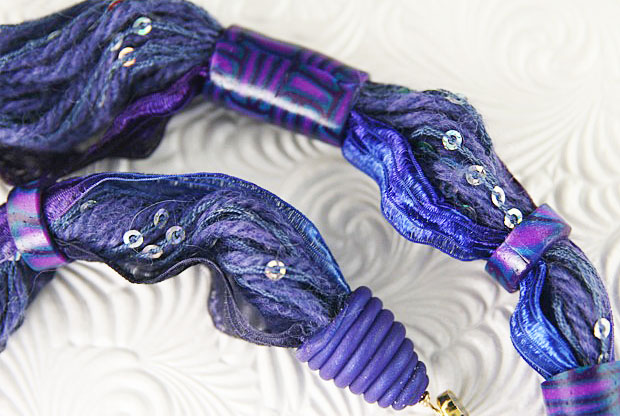
In the close-up on the right, you can see the pattern on the tube beads, as well as some of the ribbon color and the sequins that have been sewn into the yarn at the core.  I made my own end caps and one is shown here attached to a magnetic clasp.


This next necklace on the left has tube beads made from a mokume gane and metal leaf sheet I made. Each tube bead is different, but they all contain the same basic colors and they are all he same size.  This creates a more uniform appearance since the openings between the beads just tend to be more evenly spaced. I used commercial end caps for the ribbons in this necklace, with an "S" hook closured.
The close-up below shows the colors and designs on the tube beads as well as the colors in the ribbon.  They all look so well together.   The tube beads on both necklaces were finished with some Preserve Your Memories 2 spray.  It added a soft sheen what works well with the fibers.

Thursday, December 22, 2016

More Mokume Gane with Leaf

I'm dropping by to share a couple of pendant & earring sets I just finished.  I made these from the mokume gane stacks I used for demonstration in the workshop I mentioned in my last posting. You can see the difference between the pieces shown here, using gold composite leaf, and the cuff bracelets in the last post that were made with variegated leaf.  I really like the almost watery effect that the lightly tinted translucent clay makes when it is over composite leaf.   As you may be able to tell in the photos, the pieces I made using the variegated leaf look more like slices of stone.   The teal pieces shown here have the appearance of looking into small pools of water.    I also had fun creating openings in the teal pieces and adding the sparkle of some crystals.  The finish on the green and pink set is Magic Gloss, while I used PYM 2 on the teal set.

Saturday, December 17, 2016

New Sparkle on Brass Cuffs

Recently, I was teaching a mokume gane workshop using composite gold metal leaf.  One of the participants mentioned they had seen variegated metal leaf and wondered when that might be used. Our conversation got me thinking about using the variegated leaf in mokume gane with translucent clay.

So I decided to experiment a bit. I wanted the clay to reflect the variegated color. Rather than coloring the translucent clay with alcohol inks or pieces of opaque clay, I decided to use embossing powders and micro glitters.  I thought this would allow the translucent to remain more transparent, while still adding color and sparkle. I decided to use these sheets on some brass channel cuffs I had.  The photos here show the various effects and colors I achieved.

Some of the embossing colors were dark, and the glitter added some sparkle but did not change the hue.  I think when I try this again I may focus on using light embossing powder colors, and/or try putting a light backing on the strips of translucent clay to brighten the overall effect.

Tuesday, December 13, 2016

New Brass Bracelet Base

Okay.  I realize we've got some time here in New England before spring comes 'round, but I am already longing to see flowers popping out of the ground.  I love the color, freshness, and promise of spring...When I found a new brass bracelet base, one that adjusts a bit and goes on easily, I had to give it a try.  What better way to adorn your wrist than with polymer flowers and leaves?!  I placed the leaves on both sides of the flattened center on the base.  This made the inside look nice, and, more importantly, made the attachment between the polymer and the brass very secure.  The flowers I made separately, and then added on top of the leaves.  This is a very lightweight piece, and it seems to sit well and not slide around.  I'll have to give one a try "out in public" to see how they do.  I like checking out new designs before trying to gift or sell them.

Monday, December 12, 2016

Polymer on Glass Nail Files

As I was making more of these items last night, I realized I haven't shared this particular project on this blog.  These are glass nail files, the type used in quality salons, and they make great gifts.

The top of these files, however, is smooth glass and rather thin. Putting polymer on the handle section makes them much easier to hold and use.  The files I use are in two sizes, as you can see in the photo.  I used slices from canes and clay stacks to cover these pieces.

The five files in the picture below were covered using different sheets of translucent and metal leaf mokume gane.  This gives them an rather elegant look.  I did add an acrylic finish to the polymer on these files to help protect the metal leaf.

It's amazing what you can decorate with polymer, changing a simple object into something special and, in this case, making it easier to use.

Friday, December 9, 2016

One More Glass

Here is the wine glass I mentioned in my last post. I decided to leave it white - it has a special feel that way.  The crystals I epoxied on after baking add just the right touch. I do think these would make great gifts.

Saturday, December 3, 2016

Polymer Decorated Wine Glasses

Polymer is such fun!  As you know, it is so versatile, it seems as though just about anything you can think up is possible with polymer.  Today, I had the pleasure of teaching a workshop on decorating wine glasses with polymer.  The participants did quite well, and I really enjoyed seeing their ideas and what they designed.  These decorated wine glasses are hand washable and have several possible uses.  If the polymer design is somewhat solid and strong, and is away from the rim of the glass,  the wine glass can be used to hold a drink.  They also make a lovely gift to be used or just appreciated.   I have a couple of samples to share with you here. I'm still working on another one, and will post it when completed.  


This teal wine glass was decorated with leaves made from colored clay.  I enhanced some of the leaves with mica powders, adding more color and some shine.


The gold and black rose design below just decorates the bottom of the wine glass.  Placement of the design is up to the artist, adding to the interest and beauty of these pieces.  


Wednesday, November 23, 2016

Porcelain All Dressed Up


It's holiday time, and a bit of shine and sparkle are in order.  I have some hollow porcelain pendants I made, each one individually formed, fired, glazed and lustered. I decorated them with polymer cane slices, and freeform shapes and swirls.  Their colors glow when the light hits them, but they needed something more special than just a wire or cord to set them off.


So, I started looking around - and unearthed a treasure trove amongst my beading supplies.  Faceted crystals, glass pearls, metal heishi, crystal rondelles, and various other findings just begged to be used.

Here you have some samples of the polymer decorated porcelain focals, surrounded by sparkle and shine. Each piece also has a magnetic clasp for ease of wearing. Which one would you pick?


Tuesday, November 22, 2016

Getting Ready for the Holidays

I have been remiss on posting. Trips and holidays and the usual fall rush seem to have gotten in the way.

So, these are some photos of the things I've been making for the Westerly gallery.  I meant to show more, but sold two pieces before I had a chance to take pictures of them.

Here are a couple of my newest pieces in the "lei" line which I am enjoying so much.  I think these are fun, and I enjoy making them.  They are light weight, with movement and shapes that don't always seem to stay in the same place.  The use of translucent clay adds a special glow and depth to the components, and the embossing powder I use adds just a hint of sparkle.


Saturday, October 8, 2016

Not My Usual...

I was getting ready to teach a workshop on the feathering technique in polymer.  It's a fun and easy process, and the results always manage to amaze and delight me.  I hadn't used the technique for a while, so decided to make up a sheet for demonstration purposes.   What I ended up doing really surprised me!
Before I show you my experimental pieces, I'm going to show you a photo of jewelry pieces made up in more traditional format.   The design creates sheets that have color and pattern similarities, but the design is not a repeating pattern.  So pieces cut from the same sheet "go together" well, but do not exactly match.  The earrings, pendant and cuff bracelet in this photo show what I mean.  The stripes and mixes are not exactly the same in all the pieces, but they harmonize well.

These pieces come from a sheet a made at the workshop as I demonstrated the various steps. However, at home in preparation for the workshop, I made a sheet in similar fall colors - and took it in a totally new direction.

The next 2 photos show what I made with the feathered sheet at home.  These pieces were all cut free-hand, and I was amazed that they seemed to just work together.  I just sort of cut in a curved pattern - and look what happened!  I'm not sure what I'll do with these three loose pieces at right.

The last photo shows 2 different "wild cut" pieces placed on backgrounds using the same colors.  I'm going to put pin backings on these two.  This just demonstrates that sometimes  the clay takes us in new and interesting directions. 

Sunday, October 2, 2016

Cane Cuffs and Bud Earrings

The summer just swept by. It included a tandem bike rally in Canada and a wonderful biking trip to England, but it's hard to work with clay when you're pedaling on a bicycle.

I've finally had a chance to sit down and play for a bit with some polymer.  I spent some time creating new canes and then used the canes to make a few brass cuffs, including some new 1" pieces that really highlight the canes.  Of course, I needed some earrings to compliment some of the cuffs. Here are a few of the pieces I've been working on recently.


These brass cuff and earring sets also showcase some of the canes I've made.  I think the colors are just right for the transition from summer to fall.
Finally, here are a couple pairs of the little bud earrings I've been making.  The opening petals hug little pearls in these. In others, I've put crystals or have something hanging below the petal shapes. Sweet!

Wednesday, August 10, 2016

Adjustable Tube-bead Lariats

I really like the concept of lariats, though I haven't made that many.  A few weeks ago, I taught a workshop on making hollow tube beads.  Of course, making beads often involves deciding how to showcase them.  Usually, you have to plan on how the bead will be used and displayed. Sometimes, I have a plan all set out before I begin, while other times I have not thought about it as much as I might have.  At the end of my demo on hollow tubes, I had a couple of sweet tubes without ends. Then came Clay Connection 2016, the every-other-year polymer conference, hosted by the Southern Connecticut Polymer Clay Guild (SCPCG).  I always look forward to this conference, and this year was no exception.  I had the tube beads with me, made a couple more, then decided how I was going to use them.  Adjustable lariats!


Here are samples of 2 adjustable lariats.  I have a few more tube beads made up, but they're not in lariat form yet.  This particular design leaves the cording just loose enough so the length and the size for around the head and neck can be adjusted. I like making little pod beads at the ends, too.  They provide a form to hold while adjusting the cord length, and they're just plain fun.