Sunday, December 22, 2019

Silk Screening

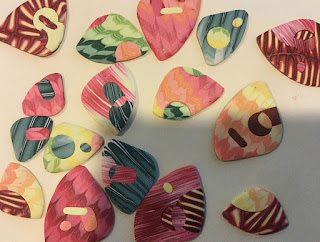
Recently, I held a class on silk screening polymer clay.  We used Lumiere acrylic paints and small silk screens on raw polymer.  Most of the students chose to make Skinner blends of two or three colors with their polymer before laying down the silk screen and applying the paint.  The results were simply lovely, and quite varied. Since I had the materials gathered, I made a few more sheets at home. Here are some of the pieces I made from the silk screening. I covered the pieces with Magic Gloss to help protect the paint.  Although the paint bakes into the polymer, and I have left silk screened pieces with a matte look, I do like the extra depth the Magic Gloss and other resins add to the polymer pieces.




Tuesday, December 17, 2019

Wearable Kaleidoscopes

A couple of weeks ago, I gave a workshop about making polymer Ikat stacks.  We used the stacks to cover these fun little wearable kaleidoscopes.  These are real kaleidoscopes, complete with a glass mirror prism inside.  A simple, adjustable golden chain makes it possible to wear around the neck.  I decided these might make fun gifts, so made a few for the Holiday Show in Westerly.  Here are some of the ones I made.


Monday, December 16, 2019

An Earring Medley

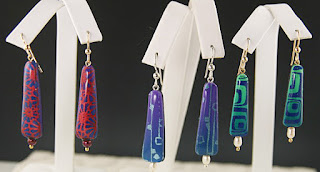
I've been doing a variety of earrings for the holiday shows, so thought I'd share some of them with you.   Earrings are fun in a way that is different from something larger such as a pendant or pin.  Here are some of the ones I've been creating.


Thursday, December 12, 2019

A Reversible Leaf & More Dichroic

Here are a few more pieces I've created for the Holiday Show in Westerly.   This seems to be the time of year for a bit of glitz and shine.   These pendants all have some sparkle on their own, and the addition of Magic Gloss resin as a finish really makes them glow.
These first photos are of a reversible leaf pendant I made.  One side has a lot of sparkle in the clay and is finished with Magic Gloss while the other side I just buffed and polished without a finish layer.

The two sides look quite different, which increases the wearability.  I really like the whole reversible concept.


The rest of these pendants use metal leaf and alcohol inks, finished with a Magic Gloss coating to protect the leaf.  This process really makes the colors vibrant.  I particularly like the pieces in reds and blues.  I used strips from a sheet I'd cut up for other pieces, and the collage effect brings attention to the various colors.


Thursday, November 28, 2019

Texture & Glitz

One of the features of polymer clay is how well it adapts to texture.  As I mentioned in an eariier post, I have a new silicon rubber mat with a cross-hatch pattern that looks a great deal like a woven fabric. and I've been enjoying working with it. Here are a few more pieces I've made using the new texture.   I pressed embossing powder into the textured clay before cutting, then baked the pieces.  The embossing powder bonded well with the clay, so I did not put a finish on the pendants and pins, primarily due to the openings on many of these pieces and the flower charm sticking through.  I am also making earrings with the texture and the embossing powder.  I plan on using Magic Gloss on them to give the powder extra shine.


Monday, November 18, 2019

Red, White & Green for the Holidays


The holiday season is upon us, and so is the flurry to get some holiday jewelry made.  Here are a couple of sets I've just completed using one of my favorite techniques, mokume gane.  

For the green set, I used layers of Jungle green, white, and some Yellow Gold Glitter.

In the red set, I layered various reds, including alizarin crimson, along with white and Premo!'s White Gold Glitter. 

 A final coating of Magic Gloss resin added depth and shine, and really made the glitter clays sparkle.

Friday, November 15, 2019

Dichroic Holiday Sets

I love the special shine and sparkle that comes from using metal leaf and alcohol inks on polymer. When the holidays start rolling around, these are the pieces that people seem drawn to, and they make great presents.  I worked up a sheet with reds, pinks, blues and purples, and have made several pieces from the base. I need to switch it up and bring in greens, yellows and oranges, so don't be surprised if you see some of those in the near future.  In the meantime, here are some of the sets from the first color combination.
The set on the left is in just two colors, and I like the calm feel.  The set on the right was made from strips of the colored sheet that were sliced and randomly placed against each other.


Monday, November 11, 2019

Cross-Hatch Marks and Holes

Here are a few pieces trying something a bit new to me.  I have always liked the fabric, tweed-like look in polymer, so was thrilled to find a deep texture piece that created a cross-hatched look.  I decided to make some jewelry, that included round openings and colors.  Here are a few of the pieces I made.

The pieces with red have silver embossing powder highlighting the cross-hatch marks.  I liked the way the edges of the holes gave extra depth to the red circles.  The large piece is a pin.


The blue piece is a pendant, and I used titanium white Pan Pastels to color the cross-hatch design. 


The earrings below have gold (left) and silver(right) embossing powder dusted on black "Twinkle" Premo! polymer.  They are quite sparkly in person, even without any special finish or resin. The crystal balls attached at the bottom of the silver pair make them look quite festive.

Friday, November 1, 2019

Great Little Lidded Box

I recently had the pleasure of attending a 2-day workshop with Carol Blackburn from the UK.   The class was sponsored by the New England Polymer Artists' Guild, and I'm delighted they brought Carol here.   She has a wealth of knowledge regarding polymer clay and has so many ideas and tips to share!  I hope she is in this area again because I'd love to take another class with her.
For this workshop, Carol taught us how to construct and decorate her small lidded boxes.  I love the shape of these, and her method for creating the structures worked beautifully.  Participants also had fun creating polymer stacks that we used to decorate the sides of our boxes.  Here are photos of the sides of my box.  I can still decorate the lid more if I want, I just haven't quite decided what I want to do.


Thursday, October 31, 2019

Fall Leaves!

One of my favorite things about autumn is the lovely colors our leaves turn here in New England.  We get everything from changing greens and yellows to reds and oranges.  Even late fall brings us coppers and golds.
I was playing around with some new texture plates, some new leaf cutters, and some polymer fall colors.  Here are some leaf pins and earrings I made.  The striped stacks I used for the earrings are pretty clear.  The pins were the result of some mokume gane and some texture play.
Experimenting can really be fun and relaxing. I hope you have some time to play with polymer and make some fall items, too.

Monday, October 7, 2019

Bonnie Bishoff - Another Great Class!

It seems I've been taking a lot of one and two-day classes over the past few months, and September was no exception. I am so pleased that the New England Polymer Artist Guild hosted Bonnie Bishoff a couple of weeks ago.  Bonnie shared with us her method of doing marquetry, also known as inlay. The designs and patterns she creates are lovely, and the way she shares colors amongst the pieces gives her finished necklaces a real harmony.  In addition, she has developed some incredible methods for linking polymer pieces together.  Her necklaces have form, grace, and movement.  All the participants just soaked up as much as we could, then worked at applying her many ideas and tips to a piece of our own.


The photos here show the pieces I developed, the necklace in "raw" form, and a close-up of a portion of the necklace.


Friday, September 20, 2019

Another Great Class with Helen!

As I mentioned in an earlier post, at Clayathon 2019 I had the opportunity to take a vessel making class from Helen Wyland-Malchow.  It was a really great class, and I learned to do something I've never tried before.  In that class, Helen wanted everyone to experience slab construction of shapes using polymer clay, and that's what I did.  However, she had some vessels she had made in a trapezoid shape with triangular bases. The shape just captivated me, and I really wanted to try it sometime.
When I found out that Helen was going to be offering the same workshop in Connecticut, I asked her if I could take the class again and do the trapezoid shape instead.  She agreed to let me do just that, and said she'd be glad to help me.  
I had a wonderful time.
The photos here are shots of the 2 sides of the vessel I made.  I'm really pleased with the decorated sheets I made, and with the way the shape turned out.  Even the top is fun!

Wednesday, September 11, 2019

Playing with More Stripes

I've been having fun making striped canes and stacks, and using them in various shapes.  I particularly like the round, hollow pin/pendants I've been working on.  Here are some of my latest pieces using stripes.

The piece on the left has a gold-plated flower with zircon center adding some sparkle and interest.  Since the edge on this one is ruffled, I did not bring the backing up to the edge.  Some of the striping shows around the edges on the back.


This next pin has very subtle stripes which I think contrast nicely with the textured parts of the piece. Some of the inspiration for this pin comes from my workshop with Fabiola Perez.
Here is another hollow round pin/pendant.  I really love the way the colors blended and how the black and white edging gives the piece an unusual look.  
For these last 2 pieces, I used the same striped stack as the round at the beginning of this post. The necklace is strung with 4mm carnelian rounds and has gold-filled disks between each bead.  The earrings are a "just for fun" pair.  I was playing with some slices and this is what evolved.