Showing posts with label lindly haunani. Show all posts

Friday, June 7, 2019

Bracelet/Earring Combos for the June Show

 While working on items for the June ACGOW Show, I also taught a workshop using the mokume gane technique.  Since I really like the mokume gane effect, I decided to make a few bracelet & earring sets.  The bracelets are polymer on brass channel cuffs.


I really liked the wavy effect in the blue set.  Perfect for summer months and time near the seashore.


Here is a red, gold and white set, also in colors just right for the summer months.


I'm including a set made with the "blurred landscape" sheet I made when working with Lindly Haunani.  It's fascinating to see all the different looks it is possible to get from polymer. It seems straight forward, but is really incredibly versatile.


Monday, May 6, 2019

New Collage Pins

As you could tell from my previous post, I had a lot of fun making a variety of design sheets and working on Lindly Haunani's collage pins.  Once I got home, I was still itching to make more collage pins using some of the sheets I'd made, as well as adding some new ones to the mix. The first pin I made was this one in oranges and pinks.
I was much more angular in my cuts than Lindly had been, and I like the fact that this pin seems to be able to be worn in more than one direction.  You can see tiny white flecks on this pin.  They come from the embossing powder I added to the white polymer that was used in the process of creating the design sheets.  It adds such a neat effect!


Next, I decided to make a very angular, rather vertical design.  These last 2 photos show the results of this experiment.  I like the strips of black separating the fields of color - a very definite contrast.  Once again, I am struck at how much color harmony is evident amongst the different patterns.  These are great examples of the thought process behind the techniques Lindly has developed.  I feel fortunate to be able to take classes with her.


Tuesday, April 30, 2019

New Ideas from Lindly


One of the workshops I took at Clayathon 2019 was called "Sagacious Shale",  taught by Lindly Haunani. Lindly is, to me, the queen of color.  I love the way she leads students through both her thought processes and the actual physical representation of those ideas.


Every time I take a workshop with her, I learn something new, and this class was no exception. Our resulting products were pin or pendant collages, in which the colors of the patterns we each used were in perfect harmony, even though there was great variation amongst the group.

One thing Lindly introduced which I had not seen her use before was to mix some white embossing powder into the white clay we used in various design sheets.  When the pieces were baked, the embossing powder suddenly appeared as little white dots - almost like snow flakes!

This posting shows some of the pins I made using Lindly's sheeting ideas and the white embossing powder.


Sunday, October 25, 2015

Ikat Three Ways

I've just returned from New Mexico where I had a fantastic time in a sculpture and armature workshop with Kate Church.  Once I finish the pieces I began, I'll post photos and tell you more!  Until then, I've other things to share.

Right before I headed to Albuquerque, I presented a workshop on Ikat techniques.  I showed the participants a few different methods for achieving the Ikat effect.  I thought I'd share some of the pieces I made from canes I developed as part of my demonstrations.  Judging from their Ikat stacks and the products students made, everyone was very successful!

The set to the left was made from a 3-color Skinner blend with white strips of clay set on top to add contrast.  The blend was then cut up and the piece were off-set making a nice stack. I cut slices from the stack and used a thin bamboo stick to draw the feathered pattern on the clay.  Rolling the pieces through the pasta machine enhanced the look.  The picture on the right shows a similar feathering pattern applied to an Ikat stack with multiple color stripes.
These pieces in purple, orange and fuschia were made from an Ikat stack made from medium thick logs of clay set up in a specific pattern.  You can see the set up online  at Polymerclaycentral.com. The earrings and the pendant between them have been further enhanced with some tiny dried flowers, then covered with Magic Gloss.  the other pendant has a satin finish, made by sanding and buffing after baking.  Also, you'll notice one pendant has the feathered design while on the other I left the Ikat design alone.

The green set was made from a 2-color Skinner Blend that I did not reduce as much as the other stacks I made.  Again, I decorated with the little dried flowers and sealed the surface with the Magic Gloss resin.


The brass cuff bracelets below were covered with twisted and swirled snakes made from the various Ikat stacks.  I love the way the colors and textures interact.


This last photo has a few pieces made based on a technique that Lindly Haunani uses for Ikat stacks.  She has a great class teaching leaves using this technique on CraftArtEdu.  If you like the Ikat look, her class is excellent.


Wednesday, July 22, 2015

Master Class Camp 2015 - Colors the Haunani Way

Ah, I adore color.  It's one of my favorite things about using polymer.  And I especially love the way Lindly Haunani leads you to find your own color-way, exploring options along the way.   For me, there is something that just clicks in the way she presents color.  Step by interesting step, Lindly helped us evaluate tones, hues, and saturations, until each person in the 2-day workshop had developed a rainbow palette that was a personal "fit."

We started by choosing photos from magazines that appealed to us and making them into a collage.  Although the pile of pictures was the same for everyone, people naturally gravitated in different directions, and the collages were all distinct and unique. Here's a snapshot from mine.

Next, Lindly helped each of us determine the appropriate primaries for making our own personal rainbow Skinner blend. It was fun to see how different the various rainbows were - and everyone seemed pleased with their results.

We developed a few canes based on our blends, and then used those canes to create beads.  The pile of beads to the left are some of mine.


This next photo shows some of my beads laid on top of my collage. How's that for a match!!


Finally, we fashioned the beads into a fun bracelet.

One of the things I found especially wonderful and intriguing about this class is that the process can be used over and over again and, depending on the season or my mood, my color choices will shift and alter a bit. Yet, I know that given a collection of items based on multiple personal collages (mine), there would be a color way that would stand out as being just "me."  How lovely!

Wednesday, March 4, 2015

Polymer Collages

What fun!  I've tried mosaics with polymer, but I haven't really tried to do much with collages.  I owe a big thanks to Lindly Haunani who presented her version of collages at CFCF 2015.  Of course, she used Skinner blend rainbows, and they made the collages especially attractive and interesting.   My first piece to the left is pretty much based on Lindly's designs.


Then I started branching off on my own a bit, using white as well as black to delineate between the colored shapes.  I also started trying different outlines for the overall shape of the pieces.  Note the gold tone rounded piece in the middle in this cluster of pendants and pins.


Here's a shape and design I really like.  One of the things that I love about polymer is the more you play, the more a technique or process evolves and becomes "your own." When you look at my first piece and then this one, I think you can see the evolution.

Next are some photos of earrings in various shapes, sizes and color-ways.


And, to add a finishing touch, I covered another little paper-mache' box using the collage technique. 

Monday, August 25, 2014

An Ikat Avalanche

My workspace looks like a snow storm made of ikat pieces!  Perhaps "ikat obsession" would have been a more appropriate heading for this post.  As I look back through this blog, I see at least 5 other posts on the ikat cane.  It is such fun to create, and there are several different versions "out there" to choose from - or to help you develop your own.

My first exposure was through Donna Kato's book,The Art of Polymer Clay Millefiori Techniques.  Donna demonstrates a couple different approaches for making ikat canes.  Lindly Haunani has developed her own approach incorporating her wonderful rainbow approach to color, and I have had a lot of fun experimenting with her method. Iris Mishly has a lovely tutorial demonstrating 3 different versions of ikat canes.  In addition, there are several free tutorials online.  Obviously, I'm not the only person who finds this look and its variations fascinating!

However, the credit (or blame) for my current ikat spree goes to Lindly.  At the polymer master class workshop in July, Lindly spent part of the last afternoon demonstrating and discussing some of the ways in which ikat can be manipulated.  While the bracelets in the photo on the right do show their ikat origin, some of the manipulated sheets don't look anything like ikat!

I decided I had to share here some of the results of my experimenting.  Hope you enjoy the show!
This little set on the left showcases my favorite ikat sheet (so far).  The ikat cane is not manipulated here except to be cut and placed in strips next to itself.  I did experiment with the spacing of colors, their order, and strip width, and particularly cut down on the amount of base or background color that I used to set the other colors apart.  I love the almost-but-not-quite Skinner blend look.  It definitely looks like fabric to me.


The leaf shape on the left is another ikat cane cut diagonally with the opposite sides flipped and butted up against a center strip of color.  I had to add some wave to the edges and it has a "leafy" feel.  If you find a tree this fall with leaves like this, I want to know!
The next two sets are examples of feathering with ikat canes.  I have always loved the look of feathering in lampwork beads, and have experimented a bit with feathering striped polymer clay sheets.  It took a nudge from Lindly, however, to make me realize I could try this with ikat.  Oh, the results!  I found that stretching the sheets out on the pasta machine after doing the initial feathering created a simply wonderful look.  Both the lavender and the yellow sets show the results of stretched feathering.
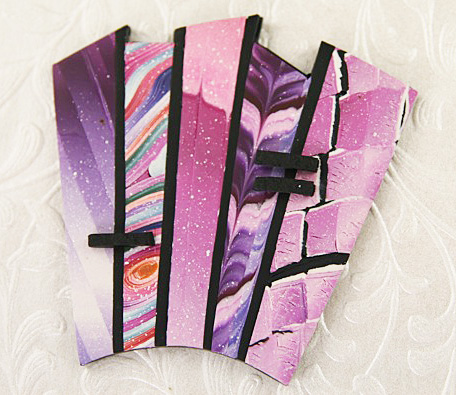
 Now for another twist:   herringbone!  This particular manipulation makes the clay look three-dimensional.  I textured this surface for a couple of reasons.  The herringbone treatment just seemed to be somewhat "rustic" and therefore more muted to me, and texturing helped ease and set the joins between the strips.  Don't you love it when form and function work together!
Here is one last example of ikat with large neutral separating strips between the colors and feathering tossed in for good measure.
Now run out and play with some ikat canes!
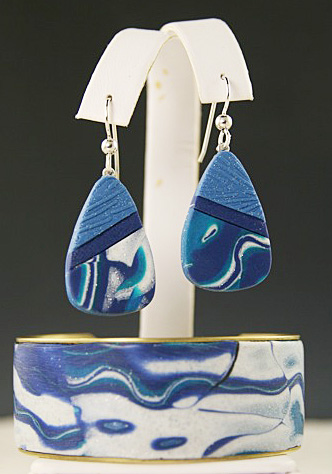
Tuesday, February 25, 2014

Haunani Gane

Lindly Haunani is the queen of the rainbow.  Co-author of the marvelous Polymer Clay Color Inspirations book, she truly understands color and its impact on what we see and make.  In addition, she has a wonderful way of getting her grasp of color across to her students.  I have thoroughly enjoyed every class I've taken with Lindly, and the class on her version of mokume gane at CFCF 2014 was no exception.  Once again, her use of color and the way in which she manipulates the clay created a special twist on a classic technique.   If you're not familiar with mokume gane, please google the words.  There is a wealth of information on the Internet about this topic.

Before sharing my results from Lindly's class, I have to back up and tell you about a workshop I gave on mokume gane a few weeks ago.  Participants were introduced to several different methods of mokume gane in polymer, one of which was the "hills and valleys" technique.  I told the students that this particular approach to mokume gane was famous as the one Lindly Haunani uses.  I was right - and wrong.  The basic concept I presented is indeed similar to Lindly's technique.  But she has taken it to a completely different level, as you will see in the samples.  The yellow pieces on the left were the result of the process as I taught it.


The lime and cherry pieces on the right were made using Lindly's approach.  I think there is a world of difference in the end result.


This last shape has not been given a protective coating yet, so it appears more matte than the other examples.  You can really see the hills and valleys in this piece.

Needless to say, I think her version of this technique is superior to any I have seen before.  If you ever get a chance to take this workshop with Lindly, I can't encourage you enough.  It is soooo worthwhile to get these effects!


Sunday, March 31, 2013

Skinner Rainbows

Blends are such a lovely way to meld colors, and the Skinner blend technique is one of my favorites. Actually,  this simple yet effective technique is visible in many of not most polymer artists' works.  One of my favorite blends to create is a rainbow.  These are made using just 3 primary colors:  yellow, red, and blue.  It is the particular shade of each of these colors which determines the rainbow's final colorations.  A rainbow made from fuchia for the red and turquoise as the blue will have a totally different look from one made with, for example, a fire engine red and a cobalt blue.  Additional changes, such as adding white or "mud" to the rainbow will result in further changes such as tone and hue.

I'm going to be the featured artist at the Westerly Arts Gallery for the month of April, and I've been working on pieces for the show.  I'm particularly pleased with three necklaces I made, all using different Skinner blend rainbows.  One piece uses the lei petals I made based on a rainbow blend developed in class with Lindley Haunani.   I strung the beads tightly to get the ruffled effect, then finished the strand with light green new jade, amethyst, and darker green jade beads.

Another necklace is similar to one I've made in the past. This necklace takes forever to assemble, since each flowerette has it's own crystal on a head pin and is then attached to the chain.  I've only made 3 of these, probably because they take so long to make. You can see the difference in the rainbow palette between the lei necklace on the hand display, and the blossom necklace below.


The third necklace used yet another rainbow blend to create roses of different sizes.  I like the movement of these roses and of the blossoms.  The chain adds to the motion with just a bit of sparkle, too.


Thursday, February 28, 2013

CFCF 2013 - Lindly's Workshops

The clay festival was wonderful - perhaps one of the best so far.  Over the next few months, I'll be sharing techniques I learned as I try applying some of them to my own work.
As I mentioned in a previous post, this year the conference honoree was Lindly Haunani.  To me, she is the queen of color. Her workshops were explorations of the rainbow and various ways in which to modify colors.  In one workshop, participants made folded petals, strung in a necklace of graduated changing colors.

In another class, individually developed rainbows were modified, and we created 2 sheets - one brighter and another more muted.  The resulting Bodacious Bubbles clay sheets were made from circles cut from and swapped between the two different shades, showing how starting with the same base ensures compatibility.  Besides, it was fun - and now I have a case to hold cutting blades.

I had a bit more clay left over, so decided to cut it up and make an ikat cane.  As the sample shows, the color blend is fun.  The wrinkles on the sheet were made from a textured wallpaper sample.  It's amazing what polymer artists find and use!


Friday, February 8, 2013

CFCF 2013 - Almost here!

Yes, it's February, and that means the Cabin Fever Clay Festival, known affectionately as CFCF, is right around the corner. I leave in 6 days, and am really looking forward to it!  Not only is it a wonderful conference, I'll get away from the snow outside.  Besides, playing with polymer all day for a week isn't hard to take!

One of the regular practices at CFCF is a bead swap.  Everyone who wants to participate makes several beads of their choice, and then these are swapped with other conference participants. Each year there is a different topic.  This year, Lindly Haunani, the queen of color, is being honored as a significant contributor to the field of the polymer arts. In her honor, the theme is "Love of Color."  Since I love leaves, they seemed a perfect form for this swap.  I used ikat canes for the surface decoration - in, naturally - all sorts of colors.  Here is a snapshot of part of the leaf pile.

Attendees also make a separate, special bead for Lindly, and these beads are presented to her at the conference party on the last evening.  I decided to make a lantern bead in one of my favorite ikat color combinations.  It's a fun bead, don't you think?


Since I'm working to get ready for the trip, there will probably not be as many blog entries for the month of February as there usually are.  In the meantime, use your imagination to picture a woods populated with trees festooned with these leaves.  Fun thoughts on a day when all I see outside is white.

Sunday, March 25, 2012

An "Ode" to Lindly & Judith

I just finished my first blossom cluster necklace. I found a wonderful silver chain with double rows of rings, and it seemed perfect for a cluster of little spring blossoms. I love the way these little flowerettes dance about as the necklace moves. The makeup of the chain allows numerous adjustments, and it wears well from choker to princess length.

For the colors, I owe special thanks to two teachers from whom I've learned much. Lindly Haunani introduced me to the marvelous potential of the rainbow in polymer, and Judith Skinner gave us all "the blend."

Monday, March 12, 2012

Ikat!! What a wonderful cane!

As you know, I went to Cabin Fever Clay Festival 2012 in late February, and had an outstanding time. I'm finally getting the chance to play with some of the things I learned. My first workshop was a full day with Lindly Haunani in which she spun her color magic for us in the form of Ikat canes. I had had very little experience with this particular type of cane, and really enjoyed Lindly's approach to making them. Here are photos of pieces I made at the workshop. The first piece I worked on was the 3-leaf pendant. I also had to try a larger leaf for a pin. As you can see, the Ikat pattern lends itself beautifully to a piece that has 2 sides, such as a leaf. Cutting the cane on the diagonal gave a great mirrored leaf-vein appearance. These were really fun to make! I also had to try some simple earrings using the cane "as is."


Then I came home, and had to try my hand at different colors and a different jewelry design. Here's my first piece - I really, really like it. The colors are quite rich, and the pearls just begged to be added...so I did! Don't they look like they belong?!